To create a comfortable and cozy atmosphere in a residential area, it is necessary to organize high-quality and technically competent lighting using different devices.
For lovers of original solutions, we recommend that you pay attention to wooden lamps that you can make yourself. Such products in recent times can be found in various cafes, catering establishments, museum and art galleries, and other public places.

Natural wood is characterized by high aesthetic properties. This is an excellent raw material that will allow skilled craftsmen to realize the most daring fantasies. Nevertheless, against the background of numerous advantages, the possibility of using wooden products is limited by some of their shortcomings.
First about the benefits:

Despite the many advantages, the tree has several disadvantages:
It's important to know! Immunity to temperature changes explains the fact that conventional filament lamps cannot be used in wooden lamps. Ideally, these should be LED products, less often - fluorescent or halogen lamps.

Any lighting device, regardless of the material of manufacture, according to the method of installation and use, can be divided into three main categories:
Pendant lights are considered more common, because in last years the fashion for antiquity and retro style returns. A wooden ceiling chandelier is suitable for use in spacious rooms and living rooms, while spotlights will look perfect in small spaces with low ceilings.
The main style directions when creating the interior of a room and lamps:

Wooden lighting fixtures can belong not only to different styles, but also be made in one form or another. The most popular of them:

The variety of wooden lamps is not limited to the models listed above. The main limiting factor in their creation is the imagination of the author. A few simple and most obvious solutions that can be taken as a basis for the manufacture of these lighting fixtures:

We offer you options for the independent manufacture of various wooden lamps, from the preparation of materials to step-by-step instructions.
Wooden lamps can be made from a variety of raw materials: parts of a tree (rhizome, stump, branches, snags), processed wood (boards, plywood sheets, veneer), etc. The final choice depends on what idea you decide to bring to life. On the other hand, it is important to properly process and prepare any material for use:

Wood is a flammable material, which makes it possible to use certain light sources. It is strictly forbidden to use lamps with a filament, because when glowing, it releases a huge amount of heat, heating not only the cartridge, but also the wood.
On a note! Ideally, LED lamps and strips should be used, most of which emit a “cold” white glow and practically do not heat up the frame of the product. To date, they are the safest elements from a fire point of view.
For the production of such a chandelier, you can take several bars square section(up to 100x100 mm). Specific dimensions depend on how large the final product should be. Apart from them. a mirror is useful. It is recommended to start any work with a sketch of the future chandelier. Be sure to include actual dimensions.
The further process looks like this:
Plywood is considered one of the most convenient and easy-to-use wood materials, for the processing of which you do not need to have special skills. A plywood lamp can be installed almost anywhere - from the terrace country house and ending different rooms apartments.
Take a sheet of plywood in your hands and draw a layout of the future product on it, not only indicating the desired dimensions, but also setting them actually on the sheet. The result should be a three-dimensional lamp, so you need to make blanks for all four sides.
Step-by-step instruction:

Branches can be found almost everywhere, so they are rightfully considered the most affordable material for creating unusual wooden lamps. Go to the nearest park or square, collect a few branches and get to work.
Important! Unlike the rest wooden blanks branches do not need to dry. The presence of moisture in them causes flexibility and the ability to create unusual shapes. Over time, they will dry themselves, so that the lighting fixture will retain its final shape.
Lampshade can be made different ways: weaving or tying thick branches with ropes. Wood can be combined with other materials, including metal frames, forged elements.

Install a cartridge inside the lampshade or fasten led strip using soft wire. If you want, you can paint wooden frame in the desired color.
In the manufacture of such a lighting device, you can use a log or driftwood. First you need to dry the lumber and apply a protective coating that prevents insects and mold. Create a blank of the desired shape and dimensions. Make special holes for the cartridge, fix the hangers and place the electrical wiring inside. On a log, you can install several shades or lampshades made from glass or cans.

If you want to save yourself the trouble, then go to lighting stores and buy ready-made wooden lamps. Now you know their advantages and disadvantages, so it will not be difficult for you to verify the quality of the proposed product, to ensure its correct and competent operation. At self-manufacturing appliances, let your imagination run wild, but do not forget about simple rules fire and electrical safety.
The chandelier in the room is not only a lighting fixture. Without exaggeration, we can say that she is the main decoration of the room. Handmade items are considered especially valuable. This allows you to highlight the special taste of the owners of the home, as well as an outstanding and creative mind. Of course, this type of work is quite complex and requires increased concentration. But at the same time, when creating decorations for your home, you can find many interesting and extraordinary solutions in it!
This article presents some ideas for decorating a chandelier with your own hands, as well as instructions for them. Everything is written so simply and clearly that anyone can do what they have planned at home.
In order to make a chandelier, sometimes the most unusual materials are used. For example, everyone is already familiar with glass or wood, plastic, and so on. But sometimes, when you want something completely “unusual”, wooden skewers, and glass wine bottles, and cans, and all kinds of tree branches, and cardboard, and even straw come into play. You need to choose depending on the idea of \u200b\u200bthe creator and on the wishes of the owners of the apartment. It is also necessary to take into account the general interior of the room where the finished product is supposed to be placed.

Plastic disposable spoons are one of the simplest and most readily available materials for creating a chandelier for a room. Their advantages are low price, variety colors and will serve such material for quite a long time. To create such an extraordinary chandelier, you will need a minimum of investments, both physical and material.
Materials:
Process of creation:

Note! Possible option decorative painting or painting spoons in absolutely any color. Thus, your product will look even more beautiful and more original!


Another unusual option in the interior will be a chandelier made in the form of leaves. It is created from simple plastic bottles, the variety of colors of which allows you to work in the most unusual colors and embody the most daring ideas.
Process of creation:

It would also be a great idea to make a new chandelier in the form of a ceiling lamp for a floor lamp or a table lamp. Thus, it will be a great addition to the previous product!

The most common version of the product is a chandelier with butterflies. And this is no accident. To begin with, this option looks luxurious and expensive, and secondly, its manufacture does not require special physical costs. Thus, even a child can participate in the creation of a chandelier.
Process of creation:


This chandelier is also based on the frame. As in the previous version, either old metal frames or dense wire are suitable for its manufacture.
After you have pre-prepared the base, proceed to cutting out the fabric from which the lampshade will be made in the future. How long the finished product will be depends on your desire, but it should be borne in mind that the width of the fabric must be the same as the diameter of the frame! Once you have finished the pattern, you need to try on.
Another nuance is that the top of the fabric will need to be sewn directly on the frame, which means that it (the frame) must be solid. Otherwise, if it is possible to thread it directly into the fabric, then you should first fold the upper edge of the pattern and stitch it, and then iron it. Then we sew a seam on the side of the product.
In order for the lampshade not to lose its shape, due attention should be paid to the material. If the fabric is too light, "airy", then the bottom of the product should be weighted. To do this, you can use cardboard or fishing line.
A neatly sewn fringe, lace or braid will also look beautiful. But do not "overload" the product! The process of making a fabric chandelier is similar to making a lace chandelier. So you can safely experiment with materials that are located on the frame.


Materials:
Process of creation:
Alternatively, you can paint the structure with a spray can or acrylic paint, attach all kinds of decorative ornaments such as butterflies, artificial flowers or beads. It's also a great idea to arrange a few balloons in the form of a bunch of grapes and fasten them together.


This version of the chandelier is a little more complicated than the previous ones. Making a chandelier for this is quite difficult, the manufacturing process will require accuracy and care. However, you will love the result!
Materials:
Process of creation:
You can also decorate the bottle with all sorts of decorative items, or leave it in its original form. In any case, it will look original and spectacular.
The number of products on the frame depends on your desire. You can either leave one bottle, or fix four or more bottles at once.


This idea is great for those who have a large number of laser discs left in the house, and the hand does not rise to throw them away. It is immediately worth noting that the manufacturing options and the result can be very different. It all depends on your imagination and creativity!
Materials:
Process of creation:
The finished product will delight its owners for a long time, and it does not require special care. It is not advisable to place this type of chandelier in the children's room so that the child cannot harm himself (only if the chandelier hangs out of reach).


To create spectacular lighting in the room, you can also make a chandelier from fabric or beads. The result is a kind of chandelier or ceiling in the style of "shabby chic".
Materials:
Working on such a ceiling is not difficult, but it is a very painstaking task. Such chandeliers usually consist of two or three levels of rings, which are located one above the other. It all depends on the size of the selected bases. If you take rings of the same diameter, then the finished product will be made in the Art Nouveau style.
One of the important points is that before you start decorating the chandelier, you need to paint and wrap the frames with decorative materials!
The approximate consumption of beads is:
Naturally, when stringing beads on a thread, you can increase or decrease their number or the degree of thread tension. But it is still desirable to stock up on materials in excess of the norm.
The essence of the work is to hang threads with beads "waterfall" or "cascade" so that they flow down the structure.
In order to make the effect of "muting" the light, you can sheathe the frame with a thick fabric.

A handmade chandelier will definitely bring a fresh touch, originality and beauty to the interior. You will immediately notice how the room will sparkle with new colors, and your guests will sincerely admire your creativity, diligence and original taste!


In contrast to the rapid progress of technology, more and more people are turning to the origins when arranging their homes. Natural materials, simplicity of lines - become relevant again. As you know, lamps carry an important mission, as if they set the general background in the interior. Original chandeliers, sconces or floor lamps made of wood will ideally fit into rooms decorated in eco-style. The beauty is that you can make them yourself, with an eye to the features of your room.
Consider vivid examples of wood crafts, depending on the type of base used.
Lamps created on the basis of finished wood products look great. Everything that your imagination allows will be used: from a cart wheel, an old barrel, to the steering wheel of a ship purchased at a flea market.
Surely, many have seen massive wooden chandeliers made of wheels in atmospheric establishments. Equipped with candle-shaped bulbs, they look like aliens from the Middle Ages. Why not make such a lamp with your own hands?
Wheel chandelier
You will need: a base wheel (you can find it in large building supermarkets), a dozen light bulbs imitating burning candles, mounting chains and a ceiling overlay to hide the wires. Decorate it with forged details to your taste.
Can't find a wheel? It doesn't matter, with the help of ordinary wooden clothespins you can make funny "plafonds". Even a teenager can handle this job.

Plafond from clothespins
And another masterpiece from wooden clothespins - on metal mesh attach clothespins in tiers. Such a ceiling can be made in an hour by connecting a child - both informative and useful for business. Complete it with an original candlestick, and a romantic atmosphere in the house is guaranteed.

Clothespin candlestick
And all you need for it is a tin can and a couple of dozen clothespins, you don’t even need to glue anything.
But what a miracle can be made from ordinary wooden hangers. Drill a hole under the hook, thread onto the pin and fasten tightly by fanning them out.

Plafond of trempils
Even an old dry barrel will come in handy - just take it out through one of the side boards. It turns out a great lantern for evening gatherings under the stars.

Barrel lamp
The most popular do-it-yourself lamps are often spherical in shape. So, in fact, from the waste you can make an original branch ball-plafond.
The same technique is used here as when creating thread balls. To do this, wrap a regular-shaped inflatable ball with a film, attach small pieces of sticks with a thermal gun (10-12 cm - based on the size of the ball, the smaller it is, the shorter the sticks are.)

Ball-shaped ceiling
Done, you can enjoy the exclusive ceiling. If desired, open it with paint, varnish or silver from a spray can.
In the same way, you can randomly wrap fresh willow twigs (or sprouts of young bamboo) around a round (square or cylindrical) base. True, it will take longer to stand the finished lamp for the branches to dry properly.

Willow ceiling
Truly magnificent lamps-balls are obtained from branches of medium thickness, cut into rounds. Drill a hole in the center in each, do not make it too small - the light transmission of the "plafond" will depend on this. And glue them according to the algorithm described above.

Plafond from branches
Take branches of different diameters to fill the surface of the base as tightly as possible when gluing.
Such an original lamp will decorate country house even during the daytime. Definitely worth spending a few hours to create it.

Country plafonds
A spectacular chandelier can be made from thin slices of wood and slices of bark - the most difficult thing is to make a neat cut. Connect them one by one, considering that the tiers should be of different sizes and arranged in descending order, imitating a cone.

Chandelier bump
Found a lush rhizome - excellent. This is a ready-made lamp for the bedroom - you just need to paint it to match the existing interior.

Rootstock chandelier
And in the evening your room turns into forest thickets - so realistic chiaroscuro.
Amazing lamps are obtained from ordinary snags. Of course, they can be ennobled by sanding and varnishing, the main thing is to choose a “plot” more interesting.

driftwood lamp
Complement the block with a modern spotlight on a thin “leg” - you get a clearly designer thing, and you can’t say that it was all done by yourself
Polished and lacquered knotted koryaks, coupled with a laconic lampshade made of paper (fabric or bamboo straw), look very stylish.

Driftwood lamps
Looks great lamp, created from the vine. Lovely mustache curls add playfulness and charm to the product. And there is no need to injure the plants - use the branches left after the next autumn pruning.

Vine lamp
Unusual chandeliers can be built from straight segments, although they look a little ominous, they allow you to maintain an eco-style in a country house.

Vine chandeliers
Moreover, it is not at all necessary to adhere to a certain geometry. Both the mentioned branch ball and the “whisk” dotted with LEDs will look great.

Geometry of fixtures
And here's how to decorate boring rectangular table lamps. This option is good not only for summer cottages, but also brings an atmosphere of natural warmth and comfort to the apartment.

Decoration for lamps
Such a lampshade is easy to make with your own hands. Paste a wooden or metal frame with pressed paper, attach a cartridge with a lamp inside. As a finish, use branches of different sizes - no one will definitely have this.

Street light
And here is the not-so-difficult option. Make a notch in the trunk of a dead tree in the area, and insert a kerosene or LED lamp inside on solar panels. Original, simple and soulful! Such a street lamp is well protected from bad weather and warms the soul on long winter evenings, shining from under the snow cap.
By the way, there is another plus - you do not have to suffer with uprooting the hemp.
Very unusual shades are obtained from birch bark, cover it with a finished lampshade made of thick paper or fabric. Only use such a lamp with caution.

Plafond from the bark
Since the bark can quickly dry out, crack and even ignite from strong heat, safety is paramount. It is preferable to install fluorescent or LED lamps - they heat up much less than conventional ones, and they consume energy significantly more economically.
Or you can just cut a birch log, drill holes (not through holes - to match the size of the base), screw a few light bulbs in a row and attach them above the dining area or desktop.

Birch lamp
In the days new year holidays ceiling lamps decorated with cones will be appropriate. Equip them with small, barely visible LEDs and the lamp will shine, spreading intricate patterns of chiaroscuro on the walls, which will further emphasize the festive atmosphere.

Plafonds with cones
Bring the cones with white paint to create the effect of frost, you can crush them with salt crystals on top.
A wonderful lamp comes out of scraps of boards for shelves - nail them to the base - ends in a circle. The main thing is to properly fit them in size and carefully grind the sections so that there are no burrs.

Plank lamp
You can slightly reduce the thickness of the boards closer to the center so that more light comes out.
If you are "on you" with figured wood cutting - try to recreate something similar. From diamond-shaped notches-cuts, form simple geometric patterns - this way the craft will look neater. These wonderful shades are appropriate in any interior - as a chandelier, wall lamp or floor lamp.
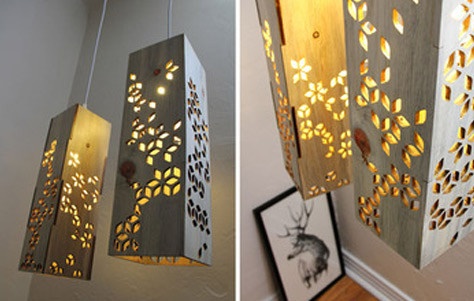
Curly cutting
Or you can just put an ordinary candle inside and set it on the table, turning off all the rest of the light in the room. We are sure that the household will appreciate such work!
On the suburban area Such a lamp-hanger will be good. This versatile craft can also be used as a street lamp in the gazebo, and you can hang frequently used items nearby (kettle, keys, towel, etc.)

Lamp with hanger
And all you need is to put together curly cut boards in random order, varnish or stain, and attach metal plates, hooks, a light bulb holder or a kerosene stove. This is easy to do with your own hands, even without, as such, the experience of carpentry.
And finally, a little about security. Given that the tree burns well, you should not use incandescent lamps in products made from it. Overheating and a small spark are enough to make the chandelier blaze like a fire under the ceiling. Therefore, use LED bulbs - they do not heat up at all even with prolonged use. Use non-flammable and non-toxic materials to process products.
Since wood is a natural material, and is an excellent medium for the development of mold fungus and pests, it is imperative that you treat the street lamp with fungicides (antiseptics, insecticides). Due to the fact that such a lamp is in the open air, you should not be afraid of harmful fumes. LED strip - what you need to know when choosing Overview and installation of ceiling LED panels, advantages and disadvantages How to quickly make a homemade lamp from a glass jar?
Light is one of the most important factors that affects our life. In addition to the main function of lighting, it can create a unique atmosphere, help to optically manipulate the size of the space, and also has great decorative properties.
Light is an important garden and terrace architect. It can create a romantic mood, enhance the beauty of plants, or simply dazzle the darkness, allowing you to spend time outside the house late in the evening and at night. The lighting itself can take on highly decorative forms, or, conversely, makes it possible to enjoy its elegant simplicity.
Many people like classic lanterns that illuminate an open space. The wooden part of the garden lantern will perfectly fit into a cozy composition. With the help of such lighting, you can create a real idyll, especially on hot summer evenings.
For owners of beautiful country houses made in the style of antiquity wooden castles or taverns, lighting fixtures made with wooden elements. A large chandelier made of natural wood will decorate the entire interior. For example, a wooden wheel chandelier.

An original proposal for a wooden lamp for the living room is a chandelier that has been twisted with natural wood veneer strips. This three-dimensional, intriguing shape will provide a subtle play of light and shadow in every living room. And during the day it will be a decoration. Wood veneer coated with acrylic lacquer will delight others for many years.

An addition to the interior in the style of minimalism will be a wooden floor lamp or table lamp, made in a thin, simple and strict geometric shape without curls and various additional decorations. Finished with acrylic lacquer, they will add charm to any bedroom.

For a stylish decoration of the interior of the sauna (bath), it would be appropriate to use lamps in the appropriate style. Decorative lattice made of wooden planks different design, will become not only an exquisite and harmonious decor for a steam room, but will also perform the protective functions of a lamp from possible damage and will contribute to the soft diffusion of light, creating a relaxing effect.

If you are bored with the monotony of the interior, in particular, in matters of lighting, and you are ready to change the design of the lamps yourself, feel free to get to work!
Consider a few master classes on how to make wooden chandeliers with your own hands.
To perform such work is simple, the result will conquer the elegance of forms.
What is included in the geometry of the room? Walls, furniture, curtains, doors and windows. But not only. You can refresh the design with an unusual chandelier, the shape of which will resemble rectangles connected by the sides of the faces to each other, inside each rectangle there is one diagonal.

To make a chandelier you will need:
Step-by-step instruction:
To fix the light bulb itself, you need to take a ready-made metal pendant for lighting. Metal parts are painted in the desired color. While the paint dries, you need to cut a hole in the frame to fix it to the factory hanger. The diameter of the hole should not be much larger than the diameter of the lamp suspension tube. But the inside must be secured with a washer or limiter. When the paint dries, you can fix the chandelier to the ceiling, fixing all the elements well. The last - the light bulb is screwed in.
The advantage of such products is that the wood is easy to work with, it is safe, because all parts that conduct electricity are hidden. A handmade chandelier can be adapted to any interior.
Making a spherical lamp (in the form of a ball), which can be used as a night light, if a low-power light bulb is provided.
Materials and tools:
If there are no ready-made veneer strips, then you can cut them from thin plywood or thick cardboard. The strips can be marked with a pencil or just cut out, as they don't have to be the same. All designs are welcome.

In a circle of a certain diameter, strips are folded, gluing them at the points of contact. For a good gluing effect, the joints are fixed with stationery clips (binders). In the process of such twisting and gluing, inserting veneered hoops of different diameters inside each other, a spherical structure is obtained.
From a piece of plywood you need to cut a square - a limiter. In the center of the square, a hole is cut out with a diameter the same as the electric cartridge, which must be threaded inside the cut out square until it stops. The inner part of the cartridge is fixed on the reverse side of the square with a cartridge collar. A wire with a fixed holder for a light bulb is pulled through a model of a chandelier wound from veneer until it stops with a plywood limiter.
The wire is pulled out of the chandelier, taking into account how it will hang.
Then the light bulb is screwed in, gently pushing the strips apart and then returning them to their place. All fasteners are checked, and now you can turn on the finished chandelier in the network.
The simplicity of the details distinguishing feature loft style. It is quite easy to do the design of a lamp with your own hands - a sconce made of wood in this design.
You will need materials and tools:
You can make a wooden bracket yourself, or you can buy a ready-made one. Drill holes in the right places through which the wire will be threaded and with which the lamp itself will be attached to the wall. The next step is painting the bracket. According to the chosen design color palette painted woodwork.
After each layer of applied paint, you need to allow time to dry.
A wire is threaded through the hole, which is wrapped in a beautiful loop around the bracket. An electric cartridge with a light bulb is attached to the top of the wire. An electrical plug is attached to the other end of the wire. The lamp is ready.
Unique hanging lamp made of flexible veneer will decorate the dining room or bedroom - its rounded shapes and neutral colors will suit the design of any interior.
Would need:
We prepare tools and materials, and proceed to the master class.
With the help of a pencil and a ruler, parallel lines of the same length and 2 cm wide are drawn on the plywood - the borders of the strips of the future elements of the chandelier, which are then cut out with a clerical knife or strong scissors. You can diversify the design of the future chandelier by cutting stripes different widths. In addition to long strips, you need to cut 4 pieces. bands that are almost 2 times smaller than the main ones. The function of these short strips is to hold the structure of the chandelier together by holding two wooden hoops together.
In order to get a limiter of the desired size, you need to take the remaining piece of plywood that was prepared earlier, put the hoop of the upper part of the chandelier on it and trace the outer contour of the hoop along the plywood with a pencil. Then, using large scissors, a limiter is cut out. In the center of the limiter, you need to cut a hole with a diameter such as an electric cartridge. A limiter with a hole is glued to the top of the hoop of the chandelier layout.
First of all, 4 pieces are glued to the wooden hoops. short strips, strictly at 90 degrees to each other, to tighten the structure. The hoops should be exactly parallel to each other. For better adhesion, you need to use clamps. After the 4 main strips-holders are glued, the space between them should be evenly filled with the remaining long strips, gluing them in the same way, fastening them with clips on the upper and lower hoops.
Original interior items made of wood bring comfort and coziness to the atmosphere. If you don’t surprise anyone with solid furniture, carvings on the shelves, then a floor lamp, chandelier or sconce made of branches or driftwood will definitely attract the attention of guests.
However, wooden products are not cheap, especially original ones. We offer to save money and create a lighting fixture with your own hands. In addition, this is a great way to implement bold ideas, while spending very little time. For the manufacture of lamps and sconces, you will need standard carpentry tools.
To understand how good a wooden lamp is, let's weigh the pros and cons of this unusual piece of decor.
Advantages:
Flaws:
Disadvantages are reduced by using different impregnations and appropriate timber preparation. Therefore, a wooden lamp can be called a useful accessory that will emphasize the style of the room and give it charm.
Lamps and sconces are made from any wood materials. Boards, branches, snags, plywood are used - the choice is determined by the idea. Nevertheless, no matter what the design for the lamp is made of, it is important to properly prepare the lumber:
In addition to wood, lampshades, carpentry tools and glue (preferably epoxy) are prepared for the manufacture of lampshades.
Since wood is a flammable material, you need to be careful with the choice of light source. It is better not to use an incandescent lamp for nightlights and lampshades - when burning, it heats up both the cartridge and the wood.
LED lamps and ribbons are suitable for such homemade products - they emit white light and do not heat surfaces, they are fireproof. Diode tapes are ideally combined with wood of any color and texture.
There are countless ideas for making home lamps. We will tell you how to make a homemade chandelier - you can take it as a basis for creativity.

For manufacturing, you will need beams of any section, for example, 100 × 100 mm or less, depending on the desired dimensions of the finished product, as well as a mirror. We recommend that you make a drawing of the chandelier in advance, which will reflect the lengths of the sides and the area of \u200b\u200bthe mirror part (it must protrude beyond the inner perimeter in order to rely on the beams).
The accessory is ready.
The video shows a version of the manufacture of such a lighting item, the principle of operation is the same:
More plank lighting ideas:


Lamps built into false beams. To make them, we connect 3 boards in a U-shape, wires and cartridges will hide in the resulting niche.

The wheel will create the effect of antiquity or a hunting lodge, a forest bungalow. We fix the electrician on the upper side of the wheel facing the ceiling.


Another interesting solution from the boards, see the video
Plywood is a lightweight material that can be easily processed. From it you can create a variety of products. For example, an unusual night lamp for a children's room or hall. It will look equally good on the terrace country house and in a city apartment.

Or like this:

For a night lamp made of plywood in the form of a house, take a universal scheme on which you can make any pattern!

Now let's start making:
The house is ready. A homemade night light or chandelier can be simple with a simple ornament or designer with a complex idea, wall or table. We present a video master class on making a house from several sections.
A plywood lamp can be of any kind. The main thing in working with this material is the need to cut holes for the passage of light. More photos of nightlights and lampshades:


To assemble such a lampshade from plywood, you need to cut a groove lock on each blank. Then the connection of parts can be carried out without glue.

A wooden chandelier diffuses light throughout the room. Connection of details is carried out by decorative self-tapping screws.
Branches are the most available material for creativity. You can collect them at any time in the park or in the square near the house and immediately start creating. The difference between branches and other wooden blanks is that they do not need to be dried. As long as they have moisture in them, they can be bent into different shapes. Over time, they will dry out and no longer straighten out.

Before harvesting twigs, you need to decide on the design of the lampshade or chandelier. Will it be weaving or tying thick sticks with a rope, will wood be combined with other products - forging, metal frames, etc. Here are some interesting ideas:


A master class will help to make such an accessory for the interior:


Generalized instructions for creating a ceiling lamp from branches:
It is easy to make a lampshade from branches; special skills are not required for this, as well as tools.
An ordinary log and even a snag can act as a blank for a chandelier. The main thing is that the material is dried and neutralized from insects and microflora.
The master class can be viewed in the video:
An unusually shaped snag or stick can be turned into a masterpiece by adding a simple lampshade to it:

Combined lamps look non-standard, for example, wooden base and glass bottles as shades.

Glass scatters light and creates shades of different colors. To make such a plafond is simple:
The video shows the process of creating an interesting table lamp.


