Parents are always trying to make the baby's life more comfortable, so furniture for various situations always relevant. While your child is small, he needs a high chair for feeding, playing and creating. Of course, such a chair can also be bought in a store, but the product good quality will cost a lot of money. And besides, sometimes you really want to do something for your baby with your own hands. Let's see if it's so hard to do child chair do-it-yourself bunny - drawings, dimensions, diagrams, you can take standard ones on the Internet or make it yourself, given the tips from this article.
Of paramount importance is the choice of material, because the health of your child directly depends on it.
Wood is the best for this. The advantages of such material are obvious:
For the manufacture of children's furniture, hardwoods such as beech, linden, birch are most often used. If you are using pine or spruce, then the wood must be deresined before starting work.
Important! When choosing wood, pay attention that there are no knots on the material. Such areas are difficult to process and subsequently the chair can quickly break.
Plywood is also very popular. It is inexpensive and easy to process. Plywood products are lightweight, which is also important for a small child. And thanks to the elasticity of the material, you can get very original carved designs.
Another material from which such things are most often made is chipboard. Flat parts are made from it: seats, backs, countertops.
Important! Its main disadvantage is fragility. It is also necessary to be scrupulous in choosing when buying, paying great attention to the environmental friendliness of the material and the availability of certificates for it.

In addition to the basic materials, to make a highchair you will also need Additional materials. These include:
Important! If the product is made of wood, then it is pre-treated with varnish, stain, or painted with paint.
Before you ask yourself how to make a highchair with your own hands, you need to understand the drawings. Ready-made can be found on construction sites or forums. Or you can develop them yourself. But before you start making, make sure that these sizes are suitable for your baby.
Important! Most the best option is to test the chair by making a model from cardboard drawings. Thus, all the flaws will come out and you can correct them without spoiling the main material.
Usually children's chairs are made according to two main schemes.
This is a product that, as a rule, folds up and comes with a table for feeding. The baby has his own regime and it is better for him to eat individually.
Important! The popular sizes of such a highchair according to many drawings and diagrams have the following meanings:
- height - 840-900 mm;
- height to the seat - 500 mm;
- to the back - 700 mm;
- back width - 455 mm;
- armrest width - 405 mm.
The name speaks for itself. It's just a small chair made to your baby's size that your baby needs to play and feed.
Important! Here, the dimensions depend directly on the age of the child, so be guided by the drawings of a specific suitable model.
If you have prepared a drawing and even tested it, now you need to turn parts from the selected material. To make the chair strong, you need to make the following basic details:
Important! If any of the parts is missing, then the chair will turn out to be unreliable, which can lead to a traumatic situation.
How to make a highchair for a child with your own hands? Remember that children's furniture, first of all, should be safe for the health of your child. That's why:
Important! If you do wooden chair then carefully choose a varnish or paint for processing the material.
How to make a highchair for a child with your own hands? Let's take a closer look at the whole process:
Important! These two designs must be identical, otherwise the chair will be uneven and it will be uncomfortable for your baby to sit on it.
Making a highchair with your own hands from plywood is much easier. In this case, the material will cost you less, and the processing effort will be less:
Important! Cut plywood carefully as it is a brittle material. The edges must be carefully processed so that the child does not get hurt during operation. The finished product must be well processed and tested.
Whatever high-quality chair you make, without proper design, your baby is unlikely to like this product. There are many ways to easily and simply decorate a highchair. The easiest option is to invite your child to color the chair together to their liking. You definitely won’t go wrong - a chair painted with your own hands will become your child’s favorite item in the children’s room.
Purchased furniture for a child's room, especially from natural materials, can be quite expensive. In the store or online, there is not always exactly the option that you like. high chair and a wooden table can be created independently. The work will not be difficult if you prepare all the necessary parts and tools, use ingenuity and imagination. The reward for labor is a unique product, the most convenient for the baby and practical at home.
You can create a children's high chair and a wooden table yourself.
A chair with your own hands will cost much less, and one made according to your own sketch will meet the intended parameters and the desired degree of comfort for the baby.

The reward for labor is a unique product, the most convenient for the baby and practical at home.
All details from natural wood can be purchased at specialized departments of hardware stores. You will pick up boards and bars of the right size.
A chair with your own hands will cost much less.
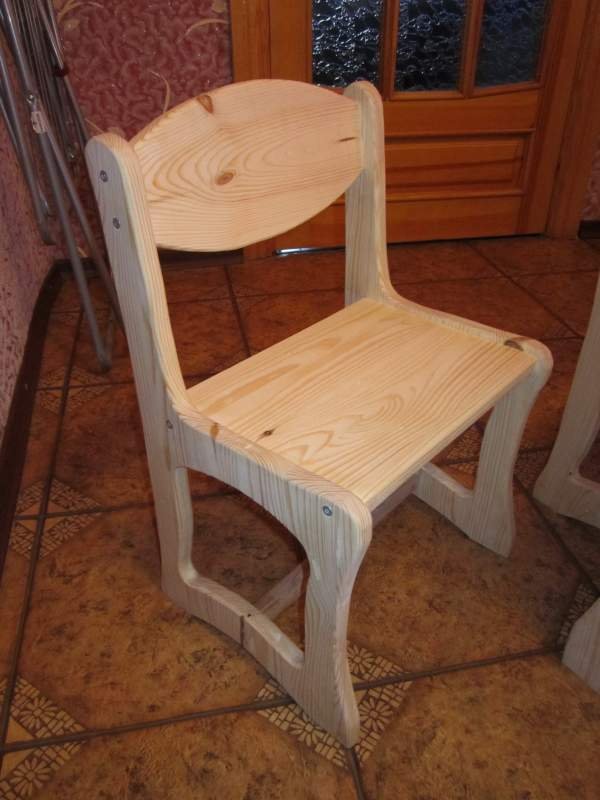
A highchair created by oneself is a solid piece of furniture for a child. In the process of work, you take into account the dimensions of the seat and back, which are as comfortable as possible for a growing baby, check the strength of the structure directly at home.

All parts made of natural wood can be purchased in specialized departments of hardware stores.
A wooden chair created by your own hands can be decorated to your liking, and not be content with a ready-made solution for purchased furniture.

You will pick up boards and bars of the right size.
To create a chair you will need various materials. Individual parts will be made from them. First of all, this wooden bars and boards from which the frame, seat and back are assembled. Instead of natural solid wood, chipboard or plywood can be used, but these materials are short-lived. For fastenings, take self-tapping screws in sufficient quantities. You will need sandpaper of medium hardness.

A highchair created by oneself is a solid piece of furniture for a child.
Bar dimensions (length):

A handmade wooden chair can be decorated to your liking.
In the manufacturing process for the legs, the thickest bars with a section of 5x5 cm are used. For the slats, parts with a diameter half that of the support ones are taken.

For slats, parts are taken with a diameter half that of the reference ones.
The parameters of the seat board (height and width) should also not exceed 20 cm. The back part may be slightly higher, but preferably no more than 30 cm.

The parameters of the seat board (height and width) should also not exceed 20 cm.
To make a chair with your own hands, you need the right tools:

The dorsal part may be slightly higher, but preferably no more than 30 cm.
The assembled highchair "requires" original decor. In addition to the carving option, you can use paint or other materials to apply a pattern or application. You will need a stencil to accurately apply the image.

The assembled chair "requires" the original decor.
For wood products, you can come up with any option. The highchair is usually made with straight supports and the following forms dorsal design:

You will need a stencil to accurately apply the image.
Creating a product with your own hands requires careful preparation. First of all, you need to make a sketch of the project. Draw a visual diagram of the connections of all parts separately with calculations of sections and lengths. Following the sketches, you will recreate the model in reality with accurate parameters. A chair, where all the thoughtful dimensions are observed, will “fit” the baby, will not create inconvenience.

For wood products, you can come up with any option.
Certain models are created with the expectation that the child will sit at the common table along with other family members. In this case, high legs are chosen for the product, which are not attached exactly vertically with respect to the seat and floor, but more widely. The lower part of such a chair will look like a truncated cone, connected for stability with wooden bars around the perimeter. The upper part will be about 30-35 cm below the level of the table.

The highchair is usually made with straight supports and the following forms of the spinal structure
If you have certain skills, then you can assemble a folding product. Such items are easily removed if necessary in storage places.

For selected design solution details are processed in accordance with it.
After preparing the drawing with the exact parameters, we begin to assemble a simple highchair.

A chair, where all the thoughtful dimensions are observed, will “fit” the baby, will not create inconvenience.
If the parts are disproportionate, "adjust" them according to the design scheme using a hacksaw. To make the highchair created by yourself comfortable, ask the baby to sit on it, ask how comfortable he is.
If all dimensions have been determined correctly, the child will like the new furniture. To make the details smooth, go over the surface with sandpaper again.

Certain models are created with the expectation that the child sits at a common table with other family members.
For varnishing the product, use only safe compositions - a special coating for children's furniture, environmentally friendly and having the appropriate certificate.

The upper part will be about 30-35 cm below the level of the table.
After finishing the exterior varnish, let the chair dry well, a day or two. Then you can start decorative trim if one is intended. If it consists in carving, then varnishing is done after the completion of the artistic processing and sanding of the parts.
Use a jigsaw for carving. You can make a decoration in the form of a flower by cutting it in the center of the back, or any geometric figure. First, at the place of the future decor, make a markup with a pencil so that the thread is even. Parts such as legs and back can be carved. The corners of the seat can be rounded off with a jigsaw and sandpaper.

In the manufacturing process for the legs, the thickest bars with a section of 5x5 cm are used.
The top can also be made not strictly rectangular, but a truncated cone, rounded, composite. In the latter option, you will need additional bars and cross bars - one or two. They are fixed due to special holes in the junctions with the dorsal frame. This is a rather time-consuming process, but if you wish, you can choose this option.

For fastenings, take self-tapping screws in sufficient quantities.
All actions for processing parts must be performed before the highchair is assembled - so the work process will be faster, more convenient and more accurate.

If you have certain skills, then you can assemble a folding product.
To make a piece of children's furniture made with your own hands look more interesting, you can put a pattern on the back and seat. To do this, you need to use safe paints. The color scheme should be bright, cheerful. Simple ornaments, floral patterns, imitation of children's toys, such as cars, look great on wooden furniture.

Instead of natural solid wood, chipboard or plywood can be used, but these materials are short-lived.
Due to the fact that the size of the product is small, a large pattern will become a kind of accent that attracts the attention of the child - he will like to sit on such a beautiful chair, play or have breakfast.

In decoration, you can use applications - there are plenty of adhesive bright films on sale.
The image will turn out even if you use a stencil previously cut out of paper or thick plastic.
In decoration, you can use applications - there are plenty of adhesive bright films on sale. The image will be monophonic or multi-color - it depends on your imagination.

First of all, these are wooden bars and boards from which the frame, seat and back are assembled.
It is not recommended to use volumetric (protruding) parts, both small and large, in the decoration of the seat or back of the children's chair. Firstly, it is inconvenient for the child, and secondly, they quickly fall off with frequent use of the product.

To create a chair, you will need various materials.
Making a chair out of plywood is not difficult at all. Made by hand under individual sizes such a piece of furniture will become a comfortable and original element of the interior with a small material investment. 
Similar articles:
Making folding chairs out of plywood different types and designs. The easiest option to start with is this. More complex structurally is a transforming chair. Here you can not do without pre-prepared drawings and carpentry skills.
Experienced craftsmen bring to life unusual ideas, getting unique products. It's nice to make practically designer chairs with your own hands, at the same time acting as a developer, manufacturer, and decorator.
There are no analogues of the product either in a furniture store or with relatives at home. An important point is a significant savings in the family budget. Homemade stools are much cheaper than factory options. Almost every owner has the tools necessary for making at home. The main thing is desire and patience.
A well-written instruction or a work plan with detailed description every step and action.
First, create templates for the details of the future piece of furniture. They are made from cardboard. With the help of a ruler and a pencil, all the components and details of the product are drawn on cardboard, cut out. Then transferred directly to plywood.
At the next stage, all the parts needed for assembly are cut out. With the help of an electric jigsaw, parts are cut out of plywood.
All elements are recommended to be carefully sanded. The surface should be as flat and smooth as possible. Without a grinder, it is difficult to completely align the parts and give the back the desired shape. If you use sandpaper, it will take a lot of time and require a lot of effort.
Drill holes for the hinges, according to pre-prepared drawings. In the role of suspension brackets, it is recommended to use bolts with sleeves. The sleeves are fixed into the holes made with glue, which will increase the reliability of their fixation.
Special wooden spikes are needed to keep folding chairs open. Holes are drilled to prepare the attachment points. The wooden spikes themselves are made from timber, cutting off 4 pieces of the length necessary for their manufacture.
Then you can start assembling according to the project or scheme. The final chord is the manufacture of the seat. Foam rubber is cut according to a given shape, covered with fabric and attached to the seat using a construction stapler.
Properly selected tools and materials for the manufacture of furniture will make the process as comfortable and productive as possible.
You will need:
If you manage to get or borrow a conductor for assembling furniture, this will be a great help in your work.
Plywood chairs should, like any other type of furniture, be durable and comfortable. It is difficult for novice craftsmen to independently develop a model and calculate the loads that allow them to withstand the required weight. Therefore, the project and drawing of the future chair can be found ready-made or consult with more experienced craftsmen.
There are special tables for matching the height of a person and the required height of the chair. Before manufacturing, you need to consider who will most often use the product. The model made under the individual sizes will be comfortable and convenient.
Before you start making a chair with your own hands, it is advisable to draw up a work plan. It is necessary to determine the size and design of the product, prepare tools and materials for making a chair, choose the type of decor and upholstery.
To avoid damage to the material, do not rush. The main thing is to do everything in accordance with the drawings.
A simple decor will help to give a stylish and original look to a self-made furniture module. Ordinary plywood is not the most visually attractive material, so it's worth taking the time to give the product a more interesting and beautiful surface.
The easiest way is to process the finished model with varnish. This will improve the visual perception of the product and decorate it externally. You can paint the surface of the furniture with wood paint, and then varnish it. This is how unity can be achieved. color solution the interior of the room in which there will be chairs.
Quite laborious, but more interesting option- apply an ornament or a complex pattern. In this case, a wide scope for creativity opens up and it all depends on the imagination and skill of the author. It is recommended to use not ordinary, but waterproof paints. In addition, it is advisable to purchase brushes of different sizes for ease of application.
Decorating the soft seats of the chairs with fabric to match the furniture in the room will make the interior harmonious and stylish.
What do you do with old furniture?
The difficulties in caring for children are largely due to the fact that buying everything you need can be quite a task for the family budget. Another question is whether parents manage to find exactly what they would like in stores, or in fact there is nothing ideally suitable among the assortment. Both reasons that prevent the purchase of a particular product, one way or another, suggest that it would be nice to make it yourself. For example, a high chair - if dad has enough experience with various tools, he may well make it with his own hands.

Contrary to seeming simplicity, a do-it-yourself highchair is not so simple task to perform it without any preparation. Do not start work until you have a clear understanding of how the end result should look like, and what operations will have to be performed to achieve this.


Also, don't ignore the calculations. Any chair should be strong enough to withstand its “passenger”, and the child, although not heavy, will not sit neatly on it, especially since the dimensions of such furniture are also small.

Strength requirements are relevant not only for basic materials, but also for fasteners, be it self-tapping screws, glue or grooves. In addition, the baby is constantly growing, and it makes sense to make a high chair with a margin of at least a couple of years in advance. For all its strength, the product should be comfortable, that is, approximately correspond to the dimensions of the owner.

Also try to ensure the proper lightness of the furniture being made - it should be convenient for the owner to independently move his chair to where he wants to sit at the moment.

Don't forget to stay safe. Furniture, in any case, cannot be traumatic, and children's furniture even more so. No sharp edges are allowed, and if wood is the main material, as happens in most cases, then it must be carefully sanded to avoid peeling splinters. When covering the finished product with varnish or paint, give preference to natural - children tend to put everything in their mouths, and can be poisoned by a toxic coating.

Finally, remember that this chair is for a child. In addition to suitable sizes, it is also desirable for a piece of furniture to be beautiful. If complex decor is not for you, try to at least paint it in bright colors.

Before proceeding directly to the manufacture of parts, it is necessary to draw up a drawing with dimensions - this is the only way all the components will ideally fit one to the other. You can use either one of those ready-made options that are already posted on the World Wide Web, or draw up a diagram yourself. It is important to note here that there are blueprints and instructions on the Internet explaining how to make a standard look table and chair, so they are usually not suitable for those who want to create something original - for example, an elephant chair.


In terms of ease of processing and environmental friendliness among the materials for the manufacture of children's furniture, wood and its derivatives undoubtedly hold the palm. Therefore, most often you can find a wooden chair. However, you can not choose any tree - here, too, it is worth considering before proceeding with the manufacture. The most popular among all types of wood is beech. They have a strength reminiscent of oak, but are easier to work with and less expensive. In general, it is hardwoods that are considered a priority. From inexpensive options birch is often chosen, linden can also be considered.


from wood conifers spruce and pine are suitable for making furniture, but the resin contained in any such wood is dangerous - it can stain clothes, and it can also pose a health hazard. Regardless of the specific species, choose a homogeneous tree, without knots and cracks, with an even texture.

The material of the seat may be similar to the material of the body, or it may be fundamentally different. In order to save money and achieve greater flexibility, the seat is also made from plywood, and even from chipboard. When choosing them, give preference only to the most durable types, but remember that in any case they are inferior in terms of durability to solid natural wood.


For increased softness, the seat can be additionally equipped with a small foam cushion, sheathed with a fabric that is pleasant to the touch.
There is also such an option for sitting as made from plastic bottles - both whole and chopped. Harmful plastic, present in the form of garbage in any apartment and polluting environment, could get a second life, especially since its strength and durability are very high. This option is still much less common due to the difficulty of securely fastening individual parts, as well as the not very attractive appearance of the finished product.

For all its practicality and convenience, the baby will definitely not like the chair if it cannot be described with the word “beautiful”. No one makes any special chairs for teenagers, and for young children, brightness and attractiveness are very important. Therefore, do not limit yourself to only one colorless varnish or discreet monochromatic solutions. A solid color is generally acceptable only if a light or very bright shade is chosen - often it is red or yellow, the so-called "warm" tones.


If drawing is not alien to you, please your child with interesting design solutions. You can go the "adult" way, painting the frame in one color, and the seat and back in another, or you can focus on the children's desire for a bright and defiant one. The simplest option is the “rings” on the legs of the chair, any patterns and even just blots are also acceptable - provided that it looks cute and positive. Regardless of how much and what kind of paint you use, do not forget - it should not be toxic.


If you have a creative streak and a desire to complicate the task a little for common good cases, you can perform more complex decor. As an option, decorate the legs or the back of the chair with carvings, but adults would like this solution more. But for a child, an ornament in the form of one or another animal will be a chic solution. The classic option is when the back is cut out to resemble an elephant, or any other animal that is cute for a child, and then painted to look more like a "cartoon" character.


Covers can also become a kind of decor. In addition to their typical functions, such as simplifying the cleaning of furniture and increasing the comfort of its use, they can also decorate the back of the chair. Ideally, they should depict the child's favorite hero, characters from popular fairy tales, or the same animals. Mom can help with making a cover for dad, especially if she knows how to embroider or has skills in appliqué fabric. If the mother does not have such talents, you can simply change the cover from the clothes on which the necessary pictures were applied by the factory method.


The youngest children so far sit on the highchair for only one thing - eating. It is important and necessary to teach a child to eat while sitting, and indeed to sit, in particular, at the table. However, the features of its development at this stage do not allow the use of ordinary chairs for this. The problem lies in the fact that a simple chair does not have a back with handles, and a tiny child himself will not be able to sit on it evenly, and will simply fall.


As for highchairs, their dimensions usually do not allow you to choose a normal table for them. In this situation, a special highchair for feeding will be an excellent way out.
Such furniture should be comfortable for both the child and his mother - so far the child cannot eat on his own, so the mother will have to spoon-feed him. For the convenience of this operation, the chair is made at a normal height, or even a little higher - so that the mother does not bend over. The actual period of use of such a chair is about a year, so if you have one child and the family does not plan a second one at all, you can choose not the most durable materials for manufacturing.


In terms of manufacturing, the highchair is perhaps the most difficult - in it the largest number details. The relatively small seat is raised high above the floor, which makes it necessary to resort to installing additional stiffeners between the legs - for improved structural stability.


Given the specifics of the child of the appropriate age, both the backrest and the railing are simply necessary - they must completely exclude the possibility of the baby falling. Moreover, the barrier should also be in front, although it has another useful function - it plays the role of a countertop on which food will be placed. The space under the tabletop is left free - the baby will stick his legs in there.

Cutting and assembling such a chair is quite simple. First, according to the drawing, two identical side halves are cut out, which are then interconnected by the seat, backrest and stiffeners using grooves, glue or self-tapping screws. Before assembly, all individual parts should be sanded to a perfectly smooth state, the finished product is varnished or painted - ready.

The peculiarity of highchairs for children who have finally come out of infancy lies in a significant variety of design options, limited only by the creator's imagination. The back is still considered a mandatory attribute, but the railing is no longer there, as are the front barriers. It is not worth saving on materials in this situation - if the furniture is made with a margin in size, then the child will be able to use his high chair for many years.


The manufacturing process consists of a few simple steps:


No matter how detailed and intelligible a theoretical explanation is, it is unlikely to be compared in terms of information content with a good example, because it is better to see once than hear a hundred times.
H and the video is one of best examples how to make a baby chair with your own hands. The master tells literally everything, including the dimensions of the parts he used, so you can even do without a drawing, just repeating what he says. The resulting chair is quite simple in design, but easy to make. You can find many other similar videos on the network, but the models there are always approximately the same, but here the process is shown in great detail and clearly.
Watch a master class on making a highchair with your own hands:
The principle of making a baby highchair, in general, is similar, but it is worth studying in more detail both because of the increased complexity of the design, and simply because another master is already talking, who can reveal some new points.
How to make a baby highchair, see the video:
All photos from the article
Currently, there is a large assortment of a wide variety of furniture on sale, however, this does not stop home craftsmen who make it on their own. The fact is that this process is very exciting, besides, in this way you can save the family budget. For those who also decided to try their hand at this business, then we will look at how to make a stool out of plywood with our own hands.

Making plywood furniture is not as difficult as many might think. Of course, certain skills in working with the tool are needed, but they can be acquired in the process. The only thing is that you should start with simple designs, so the chair is a great option for a beginner.
I must say that a beautiful plywood chair, made independently, will perform not only a practical function, but also a decorative one. And if you make a table in the same style, you get a set of furniture that can decorate the interior country house or even apartments.
Another argument in favor self-manufacturing plywood furniture is that this work does not require a workshop with a large number of woodworking machines. It is quite possible to get by with household tools, such as a jigsaw and an electric drill. In addition, it is desirable to have a milling cutter and grinder.
Even if you have to buy these tools, they will quickly pay for themselves, since the price of good furniture is very high these days.
Advice! To give plywood products a more attractive look, they can be decorated with sawn carvings made with a manual jigsaw.

Before you start work, you need to prepare drawings of a plywood chair with your own hands. True, at first it is desirable to decide on such moments of the design as:
Having decided on all the design features, you can draw up drawings. I must say that it is not necessary to do this work yourself. There are many on the Internet finished projects. Some of them you can find on our portal.
If you wish, you can correct the finished drawings at your discretion, change their dimensions so that the product meets your requirements as much as possible.

As an example, consider how to make a folding chair according to the proposed project, which will be useful to every summer resident or fisherman. This design is quite simple, the only thing before you start manufacturing, you should make drawings of a folding plywood chair with your own hands on a one-to-one scale on millimeter paper.
As a material for the product, you will need a sheet of moisture-resistant plywood 2 cm thick. Its length and width should be at least 600x900 mm.

So, the instructions for making a folding plywood chair are as follows:

Now that the folding chair is ready, it must be varnished. To give the ends an attractive look, they can be glued with veneer.


