The point in pasting the wall on the side of the battery with foil material is an inexpensive way that does not require special knowledge to increase the temperature in the apartment by 2-5 degrees. Batteries heat the brick or concrete of the outer wall as they stand under the windows. In order for all the heat from the battery to be used to heat the room, a special heat-reflecting material must be placed between the batteries and the walls: a foil that is glued to the heat insulator. What does foil for walls with a battery give? The foil (heat-reflecting screen) behind the radiator will keep the heat in the house and save on heating.
Foil heat-insulating screen (heat reflector from the battery)
Installing a foil screen allows you to raise the temperature in the room by 2-5 degrees. How to glue the heat reflector behind the batteries?
Pasting nuances:
Watch the video: an example of mounting a heat shield under the battery
Video: how to mount a reflector under the battery
Does the thickness of the heat reflector behind the battery matter?
A thickness of 5 mm is sufficient for any wall. Reflection of heat gives itself a mirror surface of the heat reflector from the battery.
What glue to glue the heat-reflecting foil to the wall?
The heat-reflecting screen for the battery can be glued to liquid nails, it can be glued to heavy wallpaper.
They were either glued with wallpaper, or painted as far as they could reach or crawl under the battery. Today, finishing the wall behind the battery is an integral part of the repair, and no matter how you are convinced that this place will be covered with a curtain, you should not neglect this operation.
In most cases wall decoration behind the battery cannot be carried out through the installed battery. For this reason, it is necessary to carry out it either before the installation of new radiators, or remove the radiators for the duration of the work, making marks on the location of the battery, this will help determine the size of the surface being trimmed.
Painting, gluing behind the battery are all just temporary finishing options, due to the inaccessibility of cleaning in these places, wall sections finished in this way quickly become unusable. We would advise laying out a tile behind the battery, which is almost eternal, and undemanding to clean.
If at the top it is possible to finish both directly to the level of the radiator installation and to the window sill, then at the bottom it is necessary to take into account the level and height of the plinth that will be installed on the floor, because. if a tile gets in its way, the plinth will have to be cut into pieces, plugs installed, etc., which can adversely affect the appearance of the finish being carried out.
Let's start working from the bottom. We beat off the level of passage of the tile and fasten the bar of the required length with dowels to the wall. Its length should be a little more than the area to be trimmed and have a margin on the right and left sides. After that, you can proceed to the finish, of course, having previously primed the walls. We apply the solution to the first one and mount it on the wall, placing it on a bar and orienting it along the side mark. Next, the surface is leveled, if necessary, it must be knocked out in protruding places, or a solution should be added where it is lacking. After that, the tile is set horizontally, if necessary, special plastic wedges for tiles are inserted between and the bar. The next tile is oriented relative to the previous one using mounting crosses for the tile. It is also set on the bar with the help of a level and wedges.
Finishing the wall behind the battery continues in this way up to the window sill; on the last row, the tiles, if necessary, are cut with a tile cutter to the required size. After the mortar has dried, the tiles are grouted. And when it dries, you can proceed to install the radiator in place.
Boxes that hide batteries are best arranged when repairing or installing a heating system. The following materials are suitable for the manufacture of the box:
The box can become not just a decoration and disguise for a heating battery, but carry a functional or aesthetic load. If we consider the option with functionality, then, for example, using chipboard sheets and guides, we can make a cabinet the entire width of the room. The optimal height of such a cabinet should correspond to the height of the window sill if the radiator is located under the window.

The central part of the box cabinet effectively camouflages the radiator, while the rest of the box is used as a bookcase.
The aesthetic load of the box is more difficult to implement, but quite doable. A radiator located against the wall can be decorated as a fireplace. In this case, it is not necessary to use brickwork and the installation of a forged grate. You can do it much easier and make a box from a cut sheet of plywood or fiberboard.

Maintaining proportions and not deviating from the scheme, in just a few hours you can make a frame for a decorative fireplace from wooden slats and plywood and decorate it
After fixing the wooden rack frame and installing the cut plywood sheets, it remains to paste over the fireplace with a film. You can go further and stick a painted flame or smoldering coals inside the fireplace, here it all depends on the flight of your imagination.
Image gallery


One of the most time-consuming ways of masking radiators and heating pipes is implemented at the construction or major repair stage. This method involves the placement of pipes and radiators not on the wall, but inside it. Of course, this will inevitably lead to a decrease in the useful area of \u200b\u200bthe room and an increase in heat loss, but there is no need to puzzle over how to decorate radiators and heating pipes.
You can go even further and completely abandon radiators and pipes, replacing them with warm floors. If the heating efficiency is insufficient, then the heating system can be supplemented with invisible convectors mounted in furniture, window sills, plinth, floor, etc.

Invisible convectors can compete with standard heating systems with pipes and radiators
In the bathroom, it is best to hide radiators in any piece of furniture. Hanging cabinets are best suited for this. If for some reason it is not possible to hide the radiator in a cabinet, then it is better not to resort to the manufacture of hanging boxes. They will look awkward on the wall. In this case, it is better to just paint the radiator to match the walls.
As for placing the radiator on the floor, you can limit yourself to installing the screen. MDF and plastic are suitable for making the screen, it can also be glass and chrome-plated metal - these materials go well with sterile cleanliness and brilliance ceramic tiles.
In the kitchen, radiators are most often masked under the countertop window sill. This technique allows not only to hide the radiator, but also significantly increase the working surface. If we are talking about a small apartment, then this technique can be considered a significant bonus. Here it is already difficult to argue which aspect is more important - functional or aesthetic.

The functionality of the kitchen is increased by installing an additional work surface in the form of a countertop and cabinet
There is also an option to install a folding table. In this case, the color of the countertop and the color of the walls should be the same. The disadvantage of this design is the inability to make the design of the countertop perforated. The presence of a gap between the countertop and the floor, as well as between the countertop and the window sill, will help ensure normal convection.
Assembly and installation of a finished screen for a heating radiator:
Heating radiator painting:
Overview of decorative glass heating radiator grilles:
When performing masking by any of the proposed methods, one should not forget about the main functional task of the heating battery - heating and spreading heat. Incorrectly selected material, installation scheme and decoration can increase heat loss several times.
When an unsightly radiator spoils the interior, there are several ways to solve the problem: replace it with a designer or underfloor model, or simply close it with a screen / box. The latter method has several advantages:
In the children's room, the radiator should be closed with a nice grill with a lot of holes, for example, carved as in this photo
There are also disadvantages:
This option is one of the most popular because of the average price and beautiful appearance.

What is the difference between a box and a screen? The screen is designed for a battery located in a niche or under the window sill (pictured above), therefore, it covers only its front part. The box completely closes the radiator on the wall from all sides.

The screen, like the box panel, is made of perforated HDF (3 mm high density fibreboard), while the box profiles are made of MDF. Both materials are quite strong, durable and non-toxic when heated.
Advantages:
Flaws:
Price: from 1500 rubles for a finished model and from 2300 rubles for an individual order.
Selection Tips:
Here is a small selection of photos of closed batteries.

Closed battery in the interior of a small kitchen in Khrushchev


How to close the battery with drywall? With this material, you can sheathe the radiator with a box or create a niche for it in a false wall.


Advantages:


Flaws:

In the following photos you can see the finished kitchen interior with a closed battery and a drywall box in the process of being repaired.


Design and manufacturing tips:
A visual instruction on how to close the battery and pipes with a false plasterboard wall is presented in the video below.
And here is a video tutorial on how to close the radiator with a box.
In the kitchen, the battery, together with the window sill, can be built into a suite or bar counter, and in the living room, bedroom and hallway - into a bench, console or shelving.


This slider contains a selection of photos of closed radiators under the bench.


Sometimes, to hide the heating battery, it is enough to rearrange the furniture and close the device, say, with a sofa, armchair or console. In order not to disrupt air circulation, it is better to place a piece of furniture away from the battery (at least 10 cm), it is also desirable that it stand on legs - so convective flows will not be blocked.

This method of disguise is good for rented housing or when you need to solve the problem of ugly batteries at minimal cost. The advantages of the curtain are obvious: a piece of fabric is inexpensive, and the choice of colors is very large (you can change the “screens” according to your mood), while the battery is always available for repair and inspection.


Advantages:
Flaws:
Prices: from 3000 rubles for the simplest models and from 10 thousand rubles for premium wooden screens.
Here are some photos of beautifully closed batteries.


A glass screen is an excellent decorating solution, but from a thermotechnical point of view it is very controversial.


Advantages:
Flaws:

Advantages:
Flaws:

Selection Tips:

Most often, rattan cloth means a mesh of artificial rattan, woven from cellulose-based fibers with reinforcement with nylon thread. Artificial rattan is very similar to natural, but unlike it is more practical and can be dyed in any color. Natural rattan screens have natural beauty and durability, but they cost twice as much, and it is much more difficult to find them on sale.

Benefits of a rattan screen:

Flaws:
Prices: from 1700 rubles (artificial rattan screen).
Rattan fabric (both artificial and natural) can be used to make a do-it-yourself battery screen. To do this, you need to assemble a box with a frame on the corners, attach a mesh to the inside of the frame, then install the box on the radiator using brackets.
The metal structure consists of a cover and a screen and is hung on top of the battery without fixing.

Advantages:

Flaws:
Masking the radiator with curtains is a great idea, approved by both heating engineers and decorators. The only problem is that it will not work to hide the battery under the window behind the curtain without shading the room. Is it possible to hang a very light tulle as in this photo.


Flaws:
Prices: from 300 rubles.
Selection Tips:
Before closing the heating battery, it is necessary to take into account several technical nuances:


At a minimum, for trouble-free maintenance, the following should remain in good accessibility: pipe connections, valves, thermal head and threaded connections.
Not all surfaces are equally easy to paint - it depends on the location and type of surface. However, difficulties can be overcome by choosing the appropriate method. There are many different devices (such as a combination ladder) that make it easier to access hard-to-reach places and therefore save time.
Not all surfaces are equally easy to paint - it depends on the location and type of surface. However, difficulties can be overcome by choosing the appropriate method. There are many different devices (such as a combination ladder) that make it easier to access hard-to-reach places and therefore save time. For example, you can shield areas that should not get paint. Try to foresee everything in advance and have at your disposal all the necessary devices.
Coloring hard to reach places wall decoration behind the battery)
To paint the wall behind the radiator, it is best, of course, to remove it. But, firstly, only a specialist can do this, and secondly, this is a very laborious work. In such cases, use a special radiator roller. Before painting the radiator, make sure it is turned off. It is convenient to paint radiators with spray paint, just remember to wear a respiratory mask and protect the wall by inserting a large sheet of cardboard between it and the radiator.
In Soviet times, during the construction and decoration of new houses, batteries were hung on the walls without any aesthetic preparation of the latter; in the future, these sections of the walls were either glued with wallpaper or painted as far as they could reach or crawl under the battery. Today, finishing the wall behind the battery is an integral part of the repair, and no matter how you are convinced that this place will be covered with a curtain, you should not neglect this operation.
In most cases, finishing the wall behind the battery cannot be done through the installed battery. For this reason, it is necessary to carry out it either before the installation of new radiators, or remove the radiators for the duration of the work, having made notes about the location of the battery before that, this will help determine the size of the surface to be trimmed.
Painting, wallpapering behind the battery are all just temporary finishing options, due to the inaccessibility of cleaning work in these places, wall sections finished in this way quickly become unusable. We would advise laying tiles behind the battery, which is almost eternal, and undemanding to clean.
Finishing the wall behind the battery with tiles
If at the top it is possible to finish both directly to the level of the radiator installation and to the window sill, then at the bottom it is necessary to take into account the level of the floor and the height of the plinth that will be installed on the floor, because. if a tile gets in its way, the plinth will have to be cut into pieces, plugs installed, etc., which can adversely affect the appearance of the finish being carried out.
Let's start working from the bottom. We beat off the level of passage of the tile and fasten the bar of the required length with dowels to the wall. Its length should be a little more than the area to be trimmed and have a margin on the right and left sides. After that, you can proceed to the finish, of course, having previously primed the walls. We apply the solution to the first tile and mount it on the wall, placing it on a bar and orienting it along the side mark. Next, the surface of the tile is set according to the level, if necessary, it must be knocked out in protruding places, or add a solution where it is missing. After that, the tile is set horizontally, if necessary, special plastic wedges for tiles are inserted between the tile and the bar. The next tile is oriented relative to the previous one using mounting crosses for the tile. It is also set on the bar with the help of a level and wedges.
The decoration of the wall behind the battery continues in this way up to the window sill; on the last row, the tiles, if necessary, are cut with a tile cutter to the required size. After the tile mortar has dried, the tile joints are grouted. And when it dries, you can proceed to install the radiator in place.
Arrangement of space behind radiators
I have an old enough panel house. Almost twenty years have passed since its construction. Naturally, during this time, I, to one degree or another, redid almost the entire apartment.
The newest Construction Materials and technology have allowed us to significantly expand the content of the very concept of repair. If earlier we were content with whitewashing and changing wallpaper, today it can already be called a repair only with some stretch.
Take any element of the apartment: floor, walls, ceiling - today the repair of any of these elements can include a wide variety of activities. For example, the ceiling, to replace the traditional whitewash, came stretch ceiling, two or even three - level. I'm not talking about ceiling tiles, they have already become so firmly established in our everyday life that they are considered to some extent an outdated solution.
I found another use for ceiling tiles.
The space behind radiators is traditionally the bottleneck of any repair. Even just whitewashing there is quite difficult, gluing the wallpaper is also quite inconvenient, and besides, very often pasted wallpapers fly off. So the battery “flaunts” against the background of a somehow equipped wall.
And this space, I pasted over with ordinary ceiling tiles. It turned out to be quite easy to do - ceiling tiles very well tailored to any configuration of supports for heating radiators. In addition, it is also very easy to measure the location of these supports before gluing the tiles - after all, all tiles have the same dimensions.
I started the sticker with a ceiling plinth, with which I framed the lower part of the window sill. And the tile itself began to be glued from below, in the direction from balcony door. So bottom, most good visible row, turned out to be consisting of whole tiles. The same applies to the first vertical row from the balcony. In total, I got two rows, and the top row even had to be cut a little.
I glued the tiles on PVA glue, smearing the entire surface with it. The walls in front of the sticker were also smeared with glue. The adhesion of the tiles to the wall was good. Quality - checked by time. For over a year now, the tile has held up perfectly and does not fly off.
The space arranged in this way behind the radiators began to look very good. From a somewhat whitewashed corner, it turned into a completely ennobled niche. Everyone who saw my innovation appreciated it positively. Of course, this is just a small touch in the general decoration of the room, but the touch is quite noticeable. Now in all my rooms - heating niches are equipped in a similar way.
Wall decoration behind the radiator
It is better to first make a crate for the lining, then mark the brackets (install the timber) under the battery, with the expectation that the lining will take 1 cm of distance from the radiator to the wall.
In general, for convenient marking, I carry a sheet (roll) of thin plastic 1500X600 with drilled holes coinciding with the bracket installation sites (for aluminum batteries 350-500 ... up to 20 sections). The markup takes less than a minute. All you need is a pencil and a level.
Modern renovations involve full wall cladding. However, unfortunately, in any apartment, in any house there are places that are difficult to finish. This is especially true of the joints of adjacent walls, as well as window niches.
Start with a choice facing material. It should be remembered that not every finish will look beautiful indoors in the presence of so-called difficult places. So, the wallpaper in these areas can swell or crack, the tile can create some bumps and even sharp corners, the plaster can delaminate. However, the more savvy in this matter a person will take up the job, the less opportunity as a result to observe all these flaws.
So, the decoration of adjacent walls. Unfortunately, in modern buildings, the corners are usually not perfectly straight. This greatly complicates the work aimed at achieving a good look and quality finish. However, there are a couple of secrets. The process of tiling is considered the most difficult, since the most problems can arise with this material. The main nuance to be considered is the laying of tiles on both the outer and inner sides of the corner.
To achieve a high-quality result, it is best to work along horizontal guide bars, which will be located on the same level. This is necessary in order to avoid discrepancies in both horizontal and vertical tile levels.
When working with window openings, you should first deal with facing the front walls. As a rule, this work is carried out using solid tiles. Only after the end of this process, you can start finishing the side walls and window sills. In this case, the so-called edged tiles are most often used, that is, they are not solid. It is also worth noting that it is advisable to start facing the side of the window, and not from above.
It is also important to remember that in some situations it becomes necessary to make holes or cutouts in the tile itself. Therefore, it is desirable that the necessary tools, such as a tile cutter or a file, be at hand.
When working with tiles, a good option would be to perform preliminary design work. Of course, this is a very painstaking work that can take quite a lot of time. However, when carrying out such a calculation, you can save a lot on materials, as well as reduce the duration of the workflow with tiles.
So, difficult places in the house are not uncommon, but rather a pattern. Therefore, you should not be afraid of them. You just need to choose the right material, as well as, if possible, consult with a specialist who will tell you a few secrets. Only then will a person not even connected with construction and repair work cope with this difficult work.

We bring to your attention a few tricks for self-repair
It is easier to hammer a nail into a tree if it is rubbed with soap or sunflower oil.
If the screw turns when screwing in, then insert matches covered with glue into the hole.
If it is difficult to unscrew an old and rusty screw, then you need to heat its cap with a soldering iron.
Strong unpleasant odor oil paint can be neutralized by placing several cans of salt water in the room where the painting is taking place.
If a magnet is inserted into the plastic stopper from the bathroom, it can be attached in any convenient place.
To avoid moisture condensation on water pipes With cold water and related smudges in the apartment, you need to wrap the “fogging” sections of the pipes with two or three layers of bandage.
The light bulb "has a habit" of being baked onto the cartridge, and therefore, by unscrewing it, you constantly run the risk of breaking off the bulb from the base. Before screwing the light bulb into the socket, rub the thread of the base with graphite of a soft pencil: the light bulb will turn out effortlessly and get rid of its bad “habit” forever.
A dried glue brush can be easily restored. Open the metal clip with a knife, release the hair and insert it with the stuck side back into the clip. Crimp it with pliers, trim the protruding hairs - and the brush will still serve you until you buy a new one.
Do not work in vain, gluing wallpaper to walls worn with putty on alabaster. The wallpaper will fall behind, the putty will collapse. Before pasting lightly oil the walls and let them dry.
Varnishing a parquet floor will become much easier and faster if you use two rubber sponges clamped into a rag holder instead of a brush. Sponges do not leave streaks, like brushes, allow you to work standing up, away from the fresh varnish layer, WHERE the concentration of solvent vapors is maximum.
When painting or wallpapering a room, do not open windows and doors in it. Draft, moving warm or humid air will inevitably disturb the uniform drying of the paint and spoil your work.
The ceiling is painted first. Moreover, the last layer of paint or whitewash must be applied with a brush in the direction of the light (towards the window). And the previous one, therefore, across. Otherwise, no matter how carefully you do the work, brush marks will be visible on the ceiling.
The paint should be applied in a thin layer. Of course, you will not be able to cover the surface at one time. Paint it a second time (after, of course, the first layer dries). Remember that two or three thin layers of paint are always stronger than one thick one.
Even dried stains of water-based white are easily washed off the floor with vinegar.
Trying to get rid of the persistent smell of kerosene or oil paint with which your hands are stained with water and soap will not lead to success. But it is worth adding a little dry mustard to the water - the hands will quickly be washed and the unpleasant smell will disappear without a trace.
You can remove old whitewash from the ceiling with a metal brush connected to a vacuum cleaner.
A wax-like coating can be obtained by painting the surface with diluted PVA glue. To get the desired color, dilute the glue with water tinted with watercolor.
It is much easier to cut a product of the desired shape from foam rubber if it is wetted first.
If stains appear on the wallpaper, do not be sad! Lubricate them with toothpowder soaked in gasoline, and when the powder dries, brush it off the wall with a brush; after doing this operation several times, you will see that there is no point in pasting the room with new wallpaper.
Aluminum foil pasted on the wall behind the central heating battery will improve the heating of the room by reflecting the heat radiation from the radiator.
The drill will last longer if, when drilling holes in brick or concrete, it is periodically moistened with water.
Before painting metal furniture, planks, tubes, etc., wipe them with a cloth soaked in vinegar and let them dry. After that, the paint will lie better and will not peel off.
If you hold the knives for half an hour in a weak solution of table salt, then they are easily and quickly sharpened.
When sawing plywood, its surface is chipped. To make the edges smooth, you need to moisten the sheet along the cut line with hot water.
If the tile has lost its luster, wipe it with newsprint soaked in a solution of ammonia.
To make it easier to remove a layer of whitewash from the ceiling, you need to thoroughly moisten the ceiling with water and stick around with old newspapers. After drying, whitewashing along with newspapers will come off much easier.
You can drill a hole in the glass (if there is no special drill) with an ordinary unsharpened pencil clamped in a drill. Pour some dry sand on the glass, press the pencil firmly and turn on the drill. It turns out a smooth hole.
Dark spots often appear on the mirror in the bathroom. It is easy to avoid this if you smear the reverse side of the mirror with ordinary window putty. Just remember to remove the mirror from the frame first.
The plaster mixture will lay down and hold better if it is diluted not with water, but with wallpaper glue.
Currently, a huge number of wallpapers of the most different types. Consider some of the most commonly used in self-repair.
1. Paper wallpaper.
The main advantage of this type is cheapness. In addition, the walls, finished with paper wallpaper breathe, look aesthetically beautiful. The downside is that paper wallpapers get dirty easily and quickly, and, of course, you can’t wash them.
Now - this is practically the most used type of wallpaper. Vinyl wallpaper consists of a three-layer paper - vinyl. They imitate well such types of finishes as painting, textiles, plaster, etc. They are easy to wash. Another advantage is the invisibility of the joints between the canvases. Vinyl wallpaper hides wall defects quite well. Modern wallpaper Made of vinyl, they are breathable thanks to a special layer. But they are, of course, more expensive than paper ones.
3. Velor wallpaper
Velor wallpapers are made on a paper basis, on which tequila fibers are glued. These wallpapers are very beautiful, as they have a pleasant velvety look. The disadvantage can be considered rapid abrasion and the fact that wet cleaning cannot be applied to them.
So you have chosen the type of wallpaper and their colors, decided on the number of rolls. Now you can start actually pasting.
We paste over the walls
First you need to prepare the walls for gluing. There should be no greasy spots, lagging plaster, large depressions and ledges on the walls. All this needs to be cleaned off, the cavities to be plastered. The walls must be dry.
Now we close all the windows and doors. When gluing drafts are unacceptable.
Having rolled out the roll on the floor, cut off the first panel. Immediately, matching the pattern, cut off the second. Remember that you need to leave a margin of about 5 cm (calculation for shrinkage and unevenness of the wall)
Coat the wall and panel with glue using a brush or roller. The adhesive you will use depends on the type of wallpaper. When buying wallpaper, it is better to consult the seller about the choice of glue for them.
Wait five minutes. Now you can stick the strip to the wall.
Gluing the first canvas is the most important moment when wallpapering. You need to glue it strictly vertically. To do this, use a plumb line.
They begin to glue from above, smoothing the "wallpaper" from top to bottom in the center. Then smooth the panel from the center to the edges. All this is done with a soft brush or a clean cloth.
Now, according to the picture, cut off the third panel. Paste the second one on the wall. Etc.
The lower edge of the strips is cut so that only the edge of the plinth is covered.
After the room is pasted around the perimeter, the upper edge of the wallpaper is closed with a special edge matched to the color of the wallpaper or with a ceiling plinth.
Some Tips
Do not glue wallpaper behind batteries. In this place, it is better to finish the wall with paint, since a lot of dust accumulates behind the batteries, and removing it from there is quite problematic.
Sockets are a rather difficult place to paste over. Glue the strip as usual, then make two diagonal cuts in the rosette area, fold back the wallpaper and cut to the shape of the rosette. The same switches.
Near the door and window openings, the wallpaper is glued with a margin of 5 cm. Then it is cut at an angle of 45 degrees and glued to the edge of the opening. The excess is cut off.
Among modern building and finishing materials, there are practically no ones that cannot be affected by mold. Microscopic spores are present everywhere, and as soon as they enter a favorable environment (humidity over 70% and temperature not lower than 15 degrees), they immediately begin to grow. Mold can be the causative agent of any disease, from allergies to cancer.
Reasons for the appearance
The usual physical removal of mold can only give a temporary effect. In order to get rid of mold on the walls once and for all, it is first necessary to determine the causes of its occurrence.
Most often, the occurrence of the fungus is observed in rooms with high humidity - in corner rooms, in bathrooms, in basements, when the roof is leaking. For a long time, black mold has chosen "panels" with leaky interpanel joints.
Mold control
If mold spots have already appeared, you can remove mold from the walls with the help of special antiseptic agents, which are present in great abundance on the shelves of building materials stores. Any tool for removing mold on the walls is, first of all, poison. Therefore, it is necessary to work with such means with extreme caution. Before starting, it is advisable to carefully study the instructions for use.
Plastic windows
In autumn and winter, windows cry, because from the side of the street they are affected by cold, and from the side of the room - heat. At the same time, any increase in temperature and humidity in the room causes a “tearful” reaction of the windows.
Due to the good insulation of modern plastic windows air exchange between the apartment and the street becomes almost impossible. But such insulation is effective in combating cold, noise and insects. However, without air exchange, the humidity in the apartment increases and the air stagnates. Therefore, it is necessary to ventilate the room in order to exclude excess moisture, which can lead to fogging of the double-glazed window and the appearance of wet spots. And to create a favorable climate in the house, ventilation should be done regularly.
* ventilate the rooms at least once a day (opening the window for 10-15 minutes)
* if the humidity is high, it is necessary to ventilate the room more intensively. Humidity in the room should not exceed 30%
* rooms should be well heated. And window sills should cover the batteries by no more than 2/3. Or be equipped with openings for warm air access to the windows
Step-by-step instruction
* dismantle the wallpaper from the affected areas
* with a special spatula we remove a layer of putty and plaster where it has become soft and loose due to mold
* well clean the affected area of the wall
* treat the affected areas with a special solution, as well as the entire surface of the wall (to prevent mold)
* it is necessary to re-treat with a solution after 4-5 hours
* we prime the wall with an antiseptic solution
do-it-yourself wall decoration with fabric Wall decoration with fabric returns unfairly lost popularity. In fact, our great-great-grandmothers knew a lot about organizing the interior, which became much more comfortable after decorating the walls with fabrics. Damask, tapestries, jacquard fabrics - all served one purpose - to create a cozy and harmonious composition.
It is difficult to argue, because everything is true, to the last word. The fabric really makes the room comfortable and, at the same time, somehow especially solemn. Let's say a few words about whether it is possible to decorate the walls with fabric with your own hands.
It is quite possible! However, for the implementation of daring ideas, you will need to make some efforts.
Important:
1 - choose the right fabric. In principle, any will suit you, but natural, with high-quality prints (or without them), a small pattern step and not overly stretched are preferred.
2 - Decide on the method of attaching the fabric to the wall. If you have perfectly smooth walls sewn into drywall, then you can nail the fabric without first creating complex structures. (Please note that the distance between the nails should not exceed 25 cm, otherwise the fabric will look bad and sag over time). If your walls leave much to be desired, then you can, without particularly processing them, pull the fabric over a specially created frame, leaving door and window openings undressed.
3 - If you chose the second option for yourself in the previous paragraph, then consider a few important points. Firstly, you should not strive to form frames for the entire wall, since the fabric can sag, not stretch enough, deform the frame and be difficult to attach to the wall. Secondly, when choosing slats for the frame, avoid those that have rounded corners.
By itself, such a frame looks normal, but when docked with adjacent canvases, it will form a too noticeable joint. Thirdly, if your plans include wall upholstery with leather, then the frames need to be created smaller than for wall upholstery with fabric. This is not only more practical, but also much more aesthetically pleasing.
4 - Find out if additional processing of the fabric is necessary. The latter is carried out to strengthen the material, prevent its premature fading, facilitate care and even enhance the brightness of the pattern. Today, already processed materials are most often found, thanks to which wall cladding with fabric is greatly simplified and accelerated.
Prices / Order
| Name of works | Unit. | Price rub |
| Opening device for doors, arches, etc.: in brick (1/2 brick) | m² | 2300 |
| Opening device in reinforced concrete 14 cm thick | m² | 4000 |
| Opening device in reinforced concrete 18 cm thick | m² | 5000 |
| Brickwork in 1/4 brick | m² | 580 |
| Brickwork in 1/2 brick | m² | 740 |
| Brickwork in 1 brick | m² | 1100 |
| Exposure of lighthouses | m/n | 35 |
| Plaster mesh on the wall | m² | 50 |
| Brickwork plaster up to 3 cm | m² | 530 |
| Plastering brickwork over 3 cm in several stages | m² | 690 |
| Plaster wooden walls pre-upholstered with shingles or mesh | m² | 620 |
| Plastering of concrete walls up to 3 cm | m² | 530 |
| Plastering of concrete walls from 3 to 6 cm | m² | 690 |
| Plastering of concrete walls from 6 cm to 8 cm | m² | 750 |
| Non-flat wall plastering (semicircular, elliptical, etc. shapes) | m² | 900 |
| Plastering door slopes up to 30 cm | m/n | 400 |
| Plaster of door slopes from 30 to 60 cm | m/n | 450 |
| Plastering of window slopes up to 30 cm wide | m/n | 380 |
| Plastering of window slopes with a width of 30 to 60 cm | m/n | 450 |
| Plaster of arched slopes | m/n | 600 |
| Gluing rusts and joints of slabs with sickle | m/n | 80 |
| Wall gluing with reinforcing mesh | m² | 100 |
| Priming of walls after each cycle of work | m² | 50 |
| Sealing joints on drywall | m² | 200 |
| Putty for painting | m² | 550 |
| Wall putty for wallpaper (vinyl) | m² | 350 |
| Wall gluing with cork soundproofing material for painting work | m² | 280 |
| Wall gluing with decorative cork soundproofing material for concrete | m² | 340 |
| Pasting with glass wallpaper | m² | 300 |
| Pasting ordinary wallpaper (vinyl, paper) | m² | 280 |
| Pasting with embossed wallpaper | m² | 320 |
| Pasting with textile wallpaper | m² | 380 |
| Wallpapering in two levels | m² | 300 |
| wallpaper border | m/n | 80 |
| Spray painting | m² | 280 |
| Wall cladding with wall panels | m² | 460 |
| Wall cladding with polystyrene panels | m² | 440 |
| Wall cladding with brick or stone tiles (on a prepared surface) | m² | 950 |
| Facing arches with corner tiles | m/n | 950 |
| Facing with ceramic wall tiles: one pattern, with "decor" (on the prepared surface) | m² | 1300 |
| Curb installation | m/n | 250 |
| Tiling with tiles larger than 38*28 cm | m² | 1200 |
| Tiling with tiles size 10*10 | m² | 1000 |
| Tiling (mosaic) | m² | 1500 |
| Washed down the ends of ceramic tiles (porcelain stoneware) at 45 degrees | m/n | 350 |
| Cutting ceramic tiles (porcelain stoneware) according to patterns (cut on one side) | m/n | 400 |
| Cladding with reinforced tile panels | m² | 1400 |
| Cutting holes in tiles | PCS | 150 |
| Grouting | m² | 80 |
| Installing a protective paint corner | m/n | 60 |
| Installation of decorative (protective) plastic corners | m/n | 80 |
| Installation of decorative (protective) wooden corners, sanding and varnishing | m/n | 260 |
| Partition walls and glass block windows | PCS | 340 |
| Installation of plasterboard partitions with pre-fabrication of the frame in one layer | m² | from 650 |
| Installation of plasterboard partitions with preliminary frame fabrication in two layers | m² | from 950 |
| Installation of drywall on a wall with a preliminary wall lathing | m² | from 600 |
| Installation of drywall on the wall in two layers | m² | from 700 |
| Warming with mineral wool | m² | 100 |
Firms
After the construction of the house, the final chord is always the interior decoration. Upon its completion, the home is finally...
In this article, we will not consider issues related to design - this is a separate large topic, but we will analyze the most common materials used for interior decoration walls, and installation technology of these materials.
clapboard
It comes in wood or plastic. The advantage of wooden lining is that it is environmentally friendly, vapor-permeable and easy to install. Sheathed wooden clapboard the room looks warm and cozy. Cons - it requires painting or impregnation and is relatively expensive.
Wooden lining can be of several grades (highest, 1st and 2nd) and, accordingly, has a different price. When buying, check the boards for torsion, the presence of black fallen knots, evenness, tenon and groove integrity. Usually lining is produced in the form of boards of standard length - 2, 3 or 6 m, the so-called modules. If the length of the wall is more than 6 m, then, most likely, you will have to make a gap, which can then be closed with a flashing.
Also, when choosing a lining, you need to make sure that it is well dried. This is a prerequisite, otherwise, over time, as a result of shrinkage, the boards at the joints may disperse, up to the appearance of through cracks.
Plastic lining (PVC) is more durable and cheaper compared to wood and does not require additional processing, but, alas, it is less environmentally friendly (after all, plastic) and, accordingly, less suitable for interior decoration.
Fastening of any lining is carried out on a special crate frame, which can be part of the wall or attached to the surface of the finished wall.
For example, if a lining board in a panel house is mounted horizontally, then we only need to “strengthen” our main frame by adding additional vertical posts from a board of 100✕50 mm or 150✕25 mm in order to ensure a step between them of no more than 70 cm. For brick, log or log house, it will be enough to fix vertical bars 50✕50 mm on the walls (set according to the level) with the same step of 70 cm and, using linings, place them in the same plane. If the span between the elements of the mounting frame is made larger, then the deformation of the installed lining is possible - the deflection of the boards and their twisting.
If the lining is sewn vertically, then it is necessary to install an additional horizontal crate, for example, from a board 150✕25 - in the case of a panel house, or the same board or timber 50x50 horizontally along the walls with a step of 70 cm - in the case of a log house, timber and stone house.
With a horizontal arrangement, we begin to sheathe from the bottom. The bottom board is installed on the frame with the spike up, calibrated strictly according to the level and fixed. The next board is put on with a groove on the tenon of the previous board. Not always the spike easily enters the groove. This may be prevented by manufacturing defects or deformations from improper drying. Usually, the longer the board, the more difficult it is to “put on” it evenly and tightly on the underlying one. Therefore, usually the lining is “upset” - they are finished off through a wooden gasket in those places where a gap occurs.
Then the board is fixed. Usually they use nails, hammering them into the base of the spike, but not perpendicular to the surface, but with a slight slope. Then the next board will cover the hat with its groove and the wall will turn out to be “clean”. It is preferable to use galvanized nails with a reduced head 50–60 mm long.
You can also fasten the lining with the help of clamps - steel strips of a special shape. They are put on the spike of the lining and fixed with nails or self-tapping screws on the wall. The meaning of using clamps is the same - to get a "clean" wall.
Horizontal level is checked every 2-3 boards. It is necessary to achieve the tightest possible fit, since over time, as a result of the drying of the tree, the gaps between the boards will increase noticeably.
Vertical sheathing is done in the same way, with the adjustment that the boards should be installed perpendicular to the floor.
Plywood
For interior cladding, sanded moisture-resistant plywood with a thickness of at least 8 mm is usually used. It is installed on a frame similar to a frame for installing a lining with a step between elements of 60 cm. The joints between plywood sheets are covered with flashings, the finished wall is varnished or painted. The decorative qualities of plywood are low, so this finish is mainly used for utility rooms or serves as the basis for wallpapering.
Plaster
This type of work is usually carried out on stone walls, for example on brickwork or wall block surfaces. For ease of application, as well as the reliability of fixing the plaster layer, plaster meshes are often pre-installed. Optimal Thickness layer of plaster - 1-2 cm. Plastering walls is a difficult job that requires a certain skill, so we recommend entrusting this work to professionals - save time and effort.
A separate class is plasters with an upper (front) textured layer. Textured plaster contains particles of a given size, such as small stone or plastic balls up to 3 mm in size. When applying textured plaster, a certain texture, pattern is formed.
To apply such plaster, an even “base” is required - as a rule, this is a layer of ordinary plaster or any other flat surface. A special reinforcing mesh is glued to such a base. Work with textured plasters even more difficult than with ordinary ones - as a rule, this requires a course of special training.
Decorative panels
These panels are expensive. finishing material, but this is a real find for the designer. They are very beautiful, eco-friendly and easy to install. Available for sale in the form of elements various shapes, length and width. There are panels and solid ones on the market, made of different varieties wood, and from chipboard, pasted over with veneer, and from plastic of the most diverse texture, including “stone-like”, “granite-like”, “marble-like”. Also, decorative panels include ceramic wall tiles, porcelain stoneware, and so on.
For installation decorative panels a flat, smooth surface is required, in this version they can be installed on glue. If the walls are uneven and not covered with a leveling layer, for example, plaster, then a frame-crate is needed to fasten the panels. The pitch and location of the frame elements are selected based on the size and shape of the decorative panels.
Drywall, gypsum fiber
These are panels of different sizes with a thickness of 9-12 mm with gypsum filling, glued on both sides with special cardboard or fiberglass. Their use allows you to get even walls of low weight at minimal cost. In addition, gypsum fiber has an increased fire resistance index.
You can install drywall panels yourself. The basis for the installation is a frame made of light metal profiles, less often wooden bars. The structure of the metal profile frame includes a rack profile, a ceiling profile, connecting profiles, etc. To connect individual elements of the metal frame, regular connecting parts are provided - crosses, extension cords, as well as brackets for attaching to walls.
The frame is installed as follows: in the plane of the future wall, a rack profile is placed vertically in level with a step of 60 cm and attached to the floor and ceiling. Horizontal profiles “crash” into it and are fixed with self-tapping screws. The pitch of the horizontal profiles is 60 cm. To further strengthen the structure, if possible, the frame is attached to the draft walls using brackets.
Plasterboard panels are mounted on finished frame using self-tapping screws. Panel joints are sealed with a special tape, after which the entire surface is puttied, primed, and then painted or wallpapered.
In what cases does it make sense in plasterboard walls?
● When you want to hide flaws in an existing wall that has a curved or raw surface that you can't do anything about.
● If you want to mount a partition that does not load the structures below, because drywall partitions are very light.
● If necessary, perform a complex design solution with a large number of curly elements, complex surfaces, ledges, niches, etc.
Finishing touches on the wall
After the main surface of the wall is closed, it remains to install the final finishing elements. These include corners, skirting boards, platbands, flashings, etc. These elements, in addition to their main function - hiding joint errors - give the room a finished look. There is a wide variety of such elements on the market from the most different materials and for every taste. Picking up something for the realization of any design ideas is not difficult.
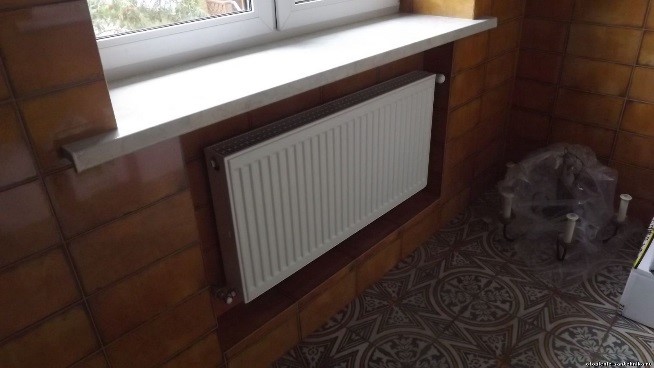
At runtime cosmetic repairs, you can get free access to almost any part of the surface. However, in almost every room there is a place where it is very problematic to get close. This place is the surface of the wall behind the radiator. How the walls are finished behind the radiator, we will consider in detail in the material of this article. Including consider the issue of finishing the wall behind the battery without removing it.
When working with the area behind the radiator, the first thing, of course, is to try to remove the battery. To date, heating radiators are mainly found in two types: aluminum and cast iron. At the same time, both types of radiators differ in the way they are connected.
For all radiators, both aluminum and cast iron, and from other materials general principle connections are the same. Regardless of the number of sections, the battery has a flow control valve hot water, a return shut-off valve, and a Mayevsky tap - an air valve designed to release an air plug from the radiator.
Battery connection diagram. With a small number of sections, the plug and return pipe are interchanged.
On the supply and return of hot water in the radiators, couplings with union nuts are installed, to which, by means of nuts, a water regulation valve is attached at the top, and a shut-off valve at the bottom. After both taps, couplings with external or internal threads are installed. And after the released couplings, either American couplings with clamping nuts or couplings for pressure testing are installed. One way or another, the supply and return heating pipes are connected to the latter.
 A nut that must be unscrewed to remove the battery.
 In order to remove the aluminum radiator, it is initially necessary to close the water supply adjustment valve and turn off the return valve. After that, it is necessary to open the Mayevsky crane. Its external design may be different. Modern vozdushki have a comfortable handle. Old-style air vents are opened with a screwdriver, which completely unscrews the bolt.
At the next stage, a basin or a low bucket is installed under the removed battery and, using either 2 wrenches or 2 adjustable wrenches, unscrew the union nuts connecting the radiator couplings to the taps. Considering that the air duct was previously opened, then it is necessary to wait until all the water drains from the radiator and remove the battery itself from the brackets.
As a rule, in old cast-iron batteries, the pipe connection is as follows. At the inlet and outlet of the water in the radiator, cast-iron couplings of the adapter are installed - fittings. The external thread of the futorka allows it to be screwed into the hole of the last section. The thread cut in the inner hole of the bushing is intended for connection metal pipe 1/2 inch. After the futorka, a metal pressure washer is located on the thread of the metal pipe.
In houses old building on cast-iron radiators, as a rule, there are no taps for adjusting the water supply and a shut-off valve. All stop valves are usually located in one place at the outlet and at the inlet of water to the gas boiler, or in the basement, if we are talking about the old one. apartment building connected to the central heating system.
 Scheme of connection of a cast-iron heating radiator.
 In the figure, the numbers indicate:
1 - clamping washer (locknut);
2 - adapter sleeve (futorka);
3 - gasket under the futorka;
4 - the base of the cast iron section.
After making sure that the water supply to the radiator is shut off, using 2 adjustable wrenches, the clamping washer is initially released on the pipe, by about 4-5 cm. on the pipe towards the released washer. In this case, it is desirable to calculate and remember the number of revolutions, since the installation of the radiator will be inversely sequential.
For various reasons, it is not always possible to remove the heating batteries. For example, if repairs are made in winter and there is a radiator at the inlet and outlet, and there are no stopcocks. In that case, there are two options. If the battery is installed close to the wall, that is, the gap is minimal, only 10-20 mm, then it is better to wait until the end of the heating season and still temporarily dismantle the battery. If the gap between the radiator is 4-5 cm, then you can finish the wall surface without removing the battery.
Plastering the walls behind the battery without removing it will not work fully. That is, it is possible to perform plastering with a cement-sand mortar, but without grouting. Finally, the walls behind the radiator will have to be leveled with putty. For applying plaster or putty, an aluminum strip 150 cm or more long and only 3-5 cm wide is used. The thickness of the strip should be about 4-5 mm so that the strip does not sag during operation.
When plastering or puttying, the solution is initially made of a thick consistency so that it does not drain from the aluminum strip. A solution is applied to the edge of the entire length of the strip, or putty, and at an angle of 45 degrees the strip is passed between the battery and the wall. The work is similar to the principle of plastering with a rule, but here the main inconvenience is associated with a battery located on the wall.
Given the small gap between the battery and the wall, it is more convenient to prime and paint with a roller with a small diameter - a mini-roller. Mini-rollers rarely appear on a wide sale, so they often have to be made independently from improvised means, using only its holder from a standard roller. To apply paint to the surface of the wall, you can also use homemade brushes or ottomans. An aluminum wire with a diameter of 0.8-10 mm is used as a handle for them, which can be bent at the desired angle during painting. In addition, there are radiator brushes on sale. The Radiator Brush is a curved brush with a long handle.
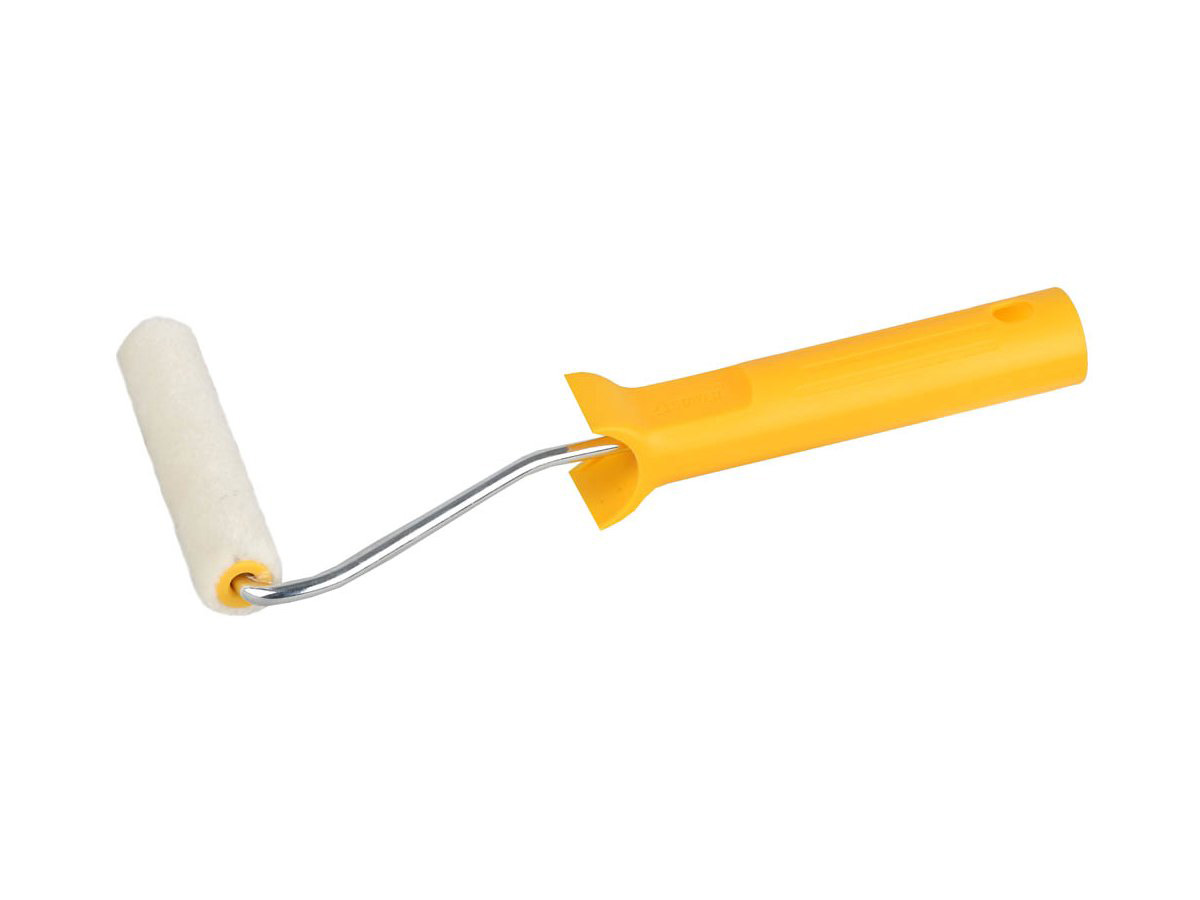 Mini roller for work behind heating radiators.
  Radiator brush.
 When sticking wallpaper behind the battery, first the wall surface is covered with glue. The adhesive is applied in the same way as paint and primer. Next, the back side of the cut piece of wallpaper is covered with a roller. After that, a piece of wallpaper is passed behind the battery and in order to press it tightly against the wall surface and smooth it out, use a second dry and clean mini-roller or ottoman on a flexible handle made of thick aluminum wire.
 Gluing tiles behind the radiator
 If the height and width of the battery are relatively small, for example, a radiator of 5 sections, then tiles can be laid on the wall behind it. The problem can only arise with the brackets on which the battery hangs. You will have to mark up the tiles so that the horizontal seam between the tiles falls exactly on the location of the two brackets. If the brackets are made of smooth reinforcement, then small notches are made on the ribs of the tile, thus, the upper and lower tiles will encircle the bracket released from the wall.
If it is very difficult to get close to the battery and it is unrealistic to remove it in the near future, then behind the radiator to the wall you can mount a glass-magnesite sheet (LMS) on the dowels, which can be pre-painted in the desired color. Wallpaper or tiles can also be glued to the sheet. The advantage of LSU is that it can be bought with any thickness from 2 to 10 mm. It should also be noted good heat-insulating and waterproofing qualities of glass-magnesite sheets. In addition to LSU, other sheet materials can be used, such as drywall, plywood, chipboard.
 Installing a glass-magnesite sheet for a battery
 Another solution when decorating the wall behind the battery and decorating radiators is to use screens for radiators. They are perforated panels various materials and are available in many patterns and colors. Such panels cover the wall along with the batteries. Thus, part of the wall behind the battery itself is hidden from view. The downside of this solution is some reduction in heat from the battery.
 Screen for radiators.
 Niches behind heating radiators are a pain point for many apartment repairs. They do not want to get involved with them, leaving them for later, but what happens in the end: they forget about them, do not finish them, and try to disguise them in every possible way. This tactic is wrong - you need to immediately take on these "secluded" places.
This article describes the technology for finishing a niche for batteries, both with the removal of radiators and without removing them.
By itself, the wall behind the central heating elements is not an entirely accessible place for conducting finishing works, and when it is recessed into a niche, the situation is doubly aggravated. Getting to such a surface becomes more difficult, there are additional angles and transitions that are not always ideal.
For various reasons, niches do not deserve finishing at all:
Leaving the problem unresolved, you can encounter it at the most inopportune moment, when the furniture and floor coverings will lie in their places, and you will need to dilute the dirt and finish the corner that spoils the whole look. After all, it may be necessary to change the layout, abandon the curtains altogether or replace them with shorter ones, and remove bulky shields.
Niche under the battery without finishing.
In addition, blocking the radiators, the owners of the apartments greatly reduce the heating efficiency. It is necessary to do quite the opposite - to open the air flow free access for convection, and trim the battery niches with isofol, reducing heat leakage to the street.

Also, the plastered surface, on which the finishing protective coating is not updated, begins to break down intensively. This entails additional financial expenses for its restoration in the future.
It is most convenient to carry out repair work on the surface of the niche with the radiators removed, then unhindered access will be provided for carrying out any operations. But, not all types of batteries are dismantled equally easily, and an attempt to unwind the old ones may fail or lead to a violation of the integrity of the heating element. In this case, to the cost of conducting repair work the need to purchase new radiators is added. Therefore, it is advisable to remove them only when it is necessary to clean the batteries or completely replace them with new ones.
The complexity of the dismantling work also depends on the type of fittings used, the time of work (during the heating season or off-season), the heating scheme and the type of radiators themselves.
It is most correct to perform operations that will be associated with depressurization of the heating system in the summer, when hot water under pressure is no longer supplied and it does not need to be reliably shut off. In addition, this will not entail cooling pipes in the whole apartment or throughout the riser of a multi-storey building.
But situations are different and, sometimes, it is necessary to remove the batteries earlier. The easiest way to do this is to modern houses where group or individual heating systems and new radiators are used. The general sequence of actions in this case is as follows:

2. Shut off the water supply. Shut off the water supply that feeds the entire system. It could be circulation pump, if applied individual heating or Ball Valves on risers of direct or return supply;

3. Pressure reduction. Then, the water pressure in the blocked circuit should be relieved. Due to this, the amount of liquid in the connected radiators will decrease. The drain valve is most often located on the drain near the boiler, in its lower part. All that is needed is to connect a suitable hose to the tap and drain the water into the sewer;

4. Battery cut-off. The thermostat valve in front of the heating element is closed to the "minus" position - this ensures complete isolation of the battery from the entire system. Some radiators have a blockable drain valve. In such models, water can be removed on site using a hex wrench. If there is no outflow blockage, the entire system will have to be drained to avoid damage that water can cause;

5. Air outlet. Using a special wrench or screwdriver, the bleed throttle is loosened to reduce the residual pressure. To be safe, hold a bowl, bucket, or other container under the vent valve to catch any escaping water. If, for a long time, heating liquid flows out of the air hole, then the shut-off valves must be checked again. Then, repeat the air removal procedure again;

6. Drain. The plugs on the radiator are unscrewed with an open-end wrench or adjustable wrench and a bowl for dirty water is supplied;

7. Analysis of threaded fasteners. Americans (large nuts) at the inlet to the radiator are unscrewed. For this, a large adjustable pipe or balloon wrench is used;

8. Removing the battery. Then, using a screwdriver, unscrew the bolts holding the aluminum radiator in a niche on the wall. If, however, a bimetallic battery is used, then you just need to remove it from the hooks and carefully lower it.

Thanks to proper preparation, dismantling can be done very quickly. When removing an old radiator, it is best to use the help of a second person, since old threaded connections are very difficult to disassemble, and scale accumulated in the heating sections gives the battery extra weight.
The most difficult thing to disassemble is the old type of pipe connections. The method of seating threaded connections on the paint and their long service life lead to the fact that such structures cannot be disconnected. In addition, the communal linking of risers involves systems that are located in neighboring apartments in this process.
1. Definition of risers. First of all, it is necessary to find out whether the type of water supply and drainage system used is upper or lower, find the direct and return heating risers and close the valves (stop valves).
2. Then, you can open the drain plugs, which are located in the basement or basement, this will allow you to remove almost all the water from the system, and the liquid will not flood the apartment and neighbors.
 Dump plug in the basement.
3. It's time to start removing the batteries themselves. Most likely, it will not be possible to disassemble the old drives and couplings, but you can try. To do this, you need to heat them with some device, for example, an industrial hair dryer. Try to unscrew couplings you need in the direction of the drive with a large margin of thread.
 A building hair dryer is also a heat gun.

4. If it was possible to disassemble the connection, then you need to make sure the integrity of the pipes, the degree of their slagging with scale and check the condition of the threads. Even when everything turned out to be in order, you need to buy a new coupling, since it is the most emergency and vulnerable point of this connection;
 If the battery is not disconnected, it is cut off.
5. In case of unsuccessful attempts - the thread does not want to be disassembled at all or it was possible to do this with excessive physical effort, but with damage to the pipes, you will have to resort to the cutting procedure. This can be done with an angle saw (grinder), a hacksaw, and using gas welding. It is better to immediately resort to the services of a welder, since you will have to restore the junction, measure and build up pipes. There is an alternative option: replace the risers with plastic ones, and install American women at the entrance to the radiators;

6. For easy removal of heavy cast iron heating elements, it is better to use the help of another person. Dirty water still remains in the battery section, so you need to carefully lift one side of the radiator and drain the liquid into a low dish, and then lay it on prepared wooden stands.
Here is one of the clear examples of dismantling old cast iron batteries:
Regardless of how the niche for the battery is finished and insulated, its surface must be carefully prepared. Preparatory work will strengthen the wall, repair damage, remove the unpleasant smell of old coatings and create conditions for further finishing.
The wall in the niche is the thinnest in the entire room, as it is recessed to the thickness of the battery, therefore, any cracks in it can be through. In addition, the replacement of window frames with new ones, the installation of a window sill, contribute to the violation of the integrity of the surface, and it needs to be repaired.
Carrying out preparatory actions in a niche is as follows:
It is necessary to first assess the scope of work: if the surfaces are durable and well preserved, then they should be slightly updated. If you have not looked here for years or want to perform a radical repair, then you will need a full range of preparatory operations.
If it is required to punch strobes (grooves) for outgoing pipes, then it is necessary to mark the walls according to the dimensions of the radiator and to make grooves with a perforator. Only after that you can start preparing a niche.
Layers of old coatings are removed: wallpaper, paint, peeling plaster. It is convenient to do this with a strong iron spatula or a hammer with a chisel. For chipping especially large and durable irregularities, you can use a perforator.

The cement apron under the heating elements is a relic of the Soviet era, which must be ruthlessly removed during a radical repair. His place will be taken by a more worthy flooring and plinth.

The wall is completely dust-free and treated twice with a deep penetration primer - concrete contact. This treatment will strengthen the thickness of the surface and ensure adhesion to future plaster.

If the surface is whole and even, then plastering is not done, but is limited to simple puttying. In the presence of hidden or obvious defects, plastering is required.
Since the place behind the battery will not be particularly conspicuous, you can not put beacons under plaster. If there are large damages, then you will have to use a reinforcing metal mesh and pre-sealed the flaws.
 Possible flaws in the wall in the niche.
 In wide niches with a large area, it is desirable to install beacons under plaster. This will significantly reduce the consumption of the dry mix and achieve the effect of a perfectly flat surface;
 Beacons set the leveling plane of the plaster.
In order for the coating to be durable and moisture resistant, it is better to use not a gypsum, but a cement-lime mixture, which dries longer and levels out worse, but is a solid and reliable base. For the best effect, cement brand 500, sifted fine sand and lime paste are used. Component ratio 1:6:1;

For plastering a medium-sized niche, seven liters of mortar is enough. It is more convenient to apply it with a small trowel on a dampened wall. At the same time, the movements should be fast, splashing. It is easier to level the mixture with a large wide spatula-rule.
After drying for 2-7 days (depending on the season), the plastered surface is covered with a thin layer of putty. This procedure will reduce the graininess of the surface and hide minor defects, as well as paint the cement wall in a pure white color. Particular care should be taken to putty the outer and inner corners of the niche and the lower edge for the installation of the plinth.

The dried, puttied wall is sanded to perfection. If this process is combined with major repairs throughout the house, then it is convenient to use a grinder with a P200 nozzle. When the niche is completed with a long delay and less dust is needed, it is more convenient to level with a sharp spatula.
A well-prepared surface is the key to the success of any finishing work and their long-term service afterwards.
The following video provides an example of niche preparation:
The space behind the radiator should be in harmony with the overall design of the room. The methods used for finishing niches for heating are similar to facing window slopes. Here you can use any type of coating. The main thing is that it can withstand temperatures of about 70 degrees. It is impossible to clad OSB with panels, plywood or PVC tiles - from heating, formaldehydes and toxins begin to be abundantly released from them. It is much better to apply other decoration methods:
It is carried out with tinted acrylic paints in one layer. The main thing is not to forget to prime the surface with a penetrating putty before starting the staining process. It is better to paint with a brush - it is not convenient to work with a roller in the inner corners and bypass the protruding radiator mounting elements. You need to try to apply the color in the same layer, quickly, preventing drying - this will help to avoid the appearance of spots;

Such cladding cannot replace preparatory plastering and puttying, because the technology of its application requires a perfectly even and uniform base. After preliminary priming, any kind of decorative plaster can be applied. Niches, the corners of which are decorated with stucco, look especially advantageous.

This traditional look decorations can also be used in this case, but it is better to choose thick types of wallpaper that do not dry out and do not turn yellow from high temperatures. The choice of glue should be approached carefully - PVA and bustilat can change from heating. Non-woven and vinyl adhesive compositions are deprived of such a disadvantage.

Application liquid wallpaper.
Silk plaster, as liquid wallpaper is also called, does an excellent job of improving the look of the battery niche and is its durable protection. You can use a single-color application, as well as create texture and highlight with other colors. The uniqueness of liquid wallpaper lies in the fact that they can be applied to the surface of the radiators themselves.

More information about applying liquid wallpaper can be found in a separate article: liquid wallpaper - types, application, drawings with liquid wallpaper.
If panel elements are used in the room: MDF, tile, decorative stone, plastic surfaces or laminate, it is quite logical to continue using this style in niches behind batteries. This option is preferable to others, since it is created for a very long time and in the future you will not even need to look behind the radiators to renew the coating.
The easiest way is to leave the space behind the heating radiators white. It is easy to maintain in this condition during routine repairs, especially with removable batteries. This option is in perfect harmony with most other types of finishes.

Decorating these inconspicuous corners, you can significantly transform general form the entire room, ennoble it and increase the space by removing masking curtains.
If the radiator is planned to be subsequently closed with a decorative shield and the surface behind it will not be visible, then shielding insulation can be used, which will increase heat transfer and convective heating work. Sticking a 5 mm layer of isofol over the entire niche area reduces heat losses for heating outer wall. In cold apartments, with weak central heating, this measure is also desirable and necessary.

Some people try to apply finishing layers on top of the insulator. However, it is impossible to decorate isofol. For example, if it is pasted over with wallpaper, then the reflectivity of the foil drops and all efforts become practically useless. By itself, this insulation looks like an independent type of finish, which can be slightly improved by adding decorative strips around the perimeter and corners.

In the northern regions, with severe frosts in winter time, the lack of heating in a small section of the wall can provoke the formation of cracks and the slow destruction of the niche. In such conditions, it is not recommended to use insulation in a limited space.
In order to fix the heat insulator, you need to carry out the usual preparatory work. A flat surface, well-drawn corners - this is a guarantee that the isofol will be accurately cut and fit snugly over the entire area. For a standard niche, you need to cut out four different-sized pieces of insulation - two on the side walls, one on the top and the last, largest piece, for rear wall niches. You can stick it on liquid nails and vinyl adhesive. Then it will be evenly and quickly fixed throughout the space, will last for decades and will not require replacement.

You can hide the isofol joints in the corners and around the perimeter if you close them with decorative plastic corners. The fixing of the corners is carried out in the correct sequence: first, aluminum strips for external and internal corners are fixed on self-tapping screws, and only then plastic elements are glued directly onto the metal.
It is necessary to remove heating radiators only in case of emergency. Systematic unwinding of fastening threaded connections leads to an increased risk of accidents during the heating season. It is extremely irrational to dismantle radiators for replacing wallpaper sheets. However, subject to a certain work technology, without removing the batteries, you can replace the wallpaper, stick ceiling tiles or isofol and apply liquid wallpaper in a mechanized way. And, it is impossible to perform high-quality painting or plastering of space with heating elements. If, they will not be removed every time, then it is better to paint and decorative plaster do not apply at all.
To replace roll wallpaper or insulation sheets, you need to stock up on a tool with long handles (curved brushes, plastic scrapers). With such a tool, you can reach the entire surface behind the pipes, press the sheets to be glued and expel air from under them. In addition, it is important to perform the correct cutting of rolls, which will facilitate the work in a narrow place.
 Putty knife.
  Brush.
 It is convenient to use wide-roll wallpaper, the width of which exceeds one meter. They can be brought in from the side wall, pasting the corner of the niche with a single piece and hiding part of the canvas behind the battery. In paper sheets, you need to cut out the grooves for reinforcing the radiators in advance and lead them by the pipes, folding them in half with the adhesive side out, and then level them with improvised devices. Isofol is glued in the same way.

The technology of applying silk plaster is even simpler. With the help of a special device (pneumatic pistol with a hope-bucket), liquid wallpaper is sprayed all over the space behind the battery. The remains of silk plaster splashes on heating elements are easily washed off with water, but you can not remove them, but cover all pipes with them.

Any repair will be incomplete if the joints and sharp transitions from one coating to another are not closed. The use of skirting boards has a positive visual effect and significantly improves any finish. Removing old cement aprons, half-decayed wooden skirting boards and replacing them with new, plastic ones is an important component in ennobling heating niches.
It is preferable to use plastic rather than wooden skirting boards, they have a lot of advantages:
Three methods have been developed for fixing skirting board elements:
The adhesive option is the fastest and easiest, but the requirements for the wall are increasing - it must be perfectly flat. If you use oil tape to protect against accidental ingress of glue, then the appearance of the finish and the skirting board itself will not suffer at all. The main disadvantage of this method of fixation is the impossibility of reusing the skirting boards.

Mounting brackets are best used in conjunction with perfectly flat floors and walls, since the skirting boards will not be fixed tightly, and there is a risk of large gaps. In addition, it is very difficult to repeatedly remove and reinstall elements on such fasteners.

The most inexpensive way to fix skirting boards is to use hardware and dowels. The fastening is rigid and quick-release. This option is good in the presence of cable channels, when the caps of the fasteners are hidden under the latch.

Plinth installation should start from inner corner niches, having previously installed a connecting corner element. Holes in the plastic strip are best made in advance with a hot nail. A wall is marked along these holes, and then nests are drilled for hardware using an impact drill.
It is more convenient to screw the self-tapping screws last, having previously cut the plinth to the size of the niche and docked it in the corner mounts. After performing all these operations, the covers of the cable channels are inserted and snapped into place.
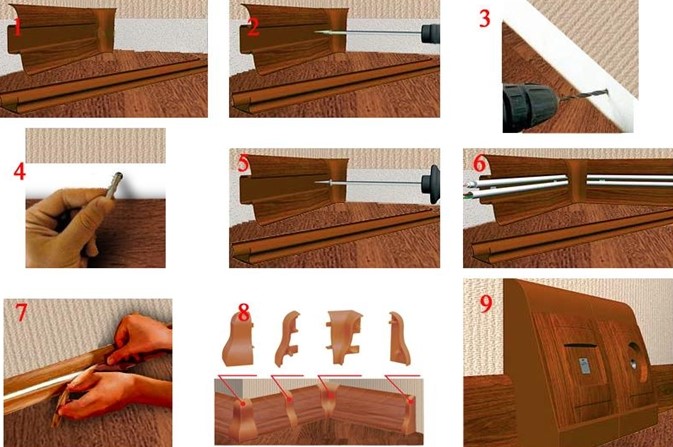
If there is no niche provided for the heating radiator initially, but you want to drown it in the wall, then you should approach this comprehensively, having comprehensively studied this issue:
When it was decided to make a deepening by reducing the wall, it is imperative to coordinate this moment with the housing inspectorate. Reducing the thickness of the bearing wall may be contrary to the requirements of the passport for the apartment. Housing with violations cannot be sold, mortgaged or inherited without restoring its original appearance. Violation of load-bearing supports can lead to the collapse of the building.
In addition, the remaining part of the wall may be too thin to support the weight of a multi-section cast iron radiator.
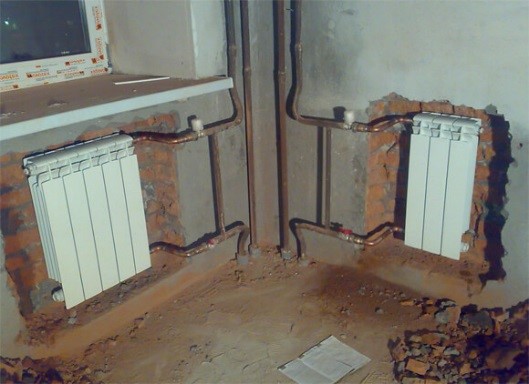
It is much easier to provide the desired recess by drowning the radiator in a drywall box. Then you can make a niche of any size and hide the outgoing pipes under the sheets.

Thinking about the size of a niche, you need to know the dimensions of the radiator that will be installed in it and the allowable value of convective air gaps. If the battery has not yet been purchased, then it is better to calculate the required number of sections, buy a suitable heating element, and only then start making a box for it.

The minimum gaps around the perimeter of the radiator should not be less than 50 mm, but it all depends on the size of the window sill, the depth of the niche, the design of the battery, and the place of its installation.

Do not forget about the insulation of the inner surface of the niche, especially if it had to be done by reducing the thickness of the walls. It is recommended to stick polystyrene boards over the entire area of the resulting recess.
The following video shows how to hide the battery in a drywall niche:
When the repair is completed, it remains to hang the battery in a niche. If a used radiator returns to its permanent place, then you don’t need to philosophize a lot to pick it up on the old mounts. However, it is worth worrying about replacing clogged iron pipes and threaded shackles with American connecting and plastic pipes.

If a new radiator has been prepared for a niche, then you need to start trying it on even before the start of all work and prepare everything else according to its dimensions: the exact supply of hot water and the placement of the return pipeline, the dimensions of the convective gaps, the installation of attachments for hanging:
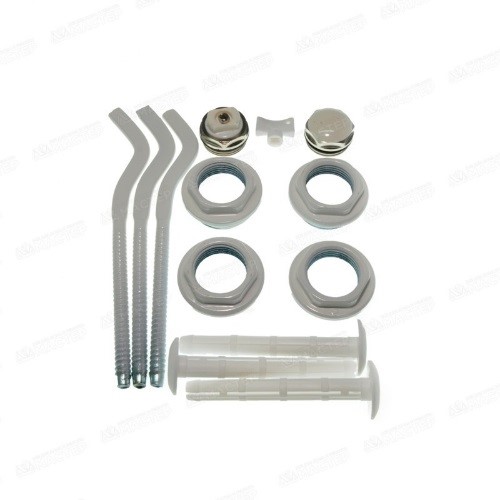
2. Measure its height with a tape measure and lay it on the wall from the bottom edge of the niche. They make an increase for the convective gap and subtract the amount of the margin, which is equal to the elevation of the battery above the fastening hook. A level line is drawn at this height.

3. The resulting line is divided in half and holes for future clamps (two or three) are marked on it. The main thing is that the holes are located symmetrically and coincide with the gaps between the sections. Now the heating element is pre-hung on the clamps;
4. Outgoing pipe connections are marked. If repairs are carried out throughout the room, then it is better to hide the pipes in a strobe and wall them up, after putting a heat-insulating cover on them;

5. When constructing a niche from drywall, you first need to carry out communications, and only then fix the guide strips and hem drywall sheets;

6. When everything is ready and you no longer need to remove the battery from the wall, you can finally assemble the threaded connections. You need to twist the American tightly to compress the rubberized gasket. At the same time, you do not need to use a fum tape, but it is better to additionally cover the thread with silicone.

Considering all these points, it is possible to turn the corners of the room that are callous to the eye into its harmonious components, without losing the performance of the heating elements.
If there is no niche in the wall behind the batteries, that is, it is flat, then you can use other methods to finish it. You can learn about which in the article: wall decoration behind batteries.


