This design with shelves at different levels allows you to competently organize the storage of everything that is commonly called "household utensils". The choice of materials and schemes for shelving is quite large, and depends mainly on the place of their installation. But if we are talking about a metal rack, then it is understood that the product is designed to withstand significant loads, as well as to be used in conditions where wood quickly becomes unusable.
For example, at high humidity. As a rule, metal racks are mounted by hand in utility rooms and buildings - pantries, sheds, garages, cellars, and so on. This article will acquaint you with their typical drawings and equip you with useful tips on the order of manufacture.
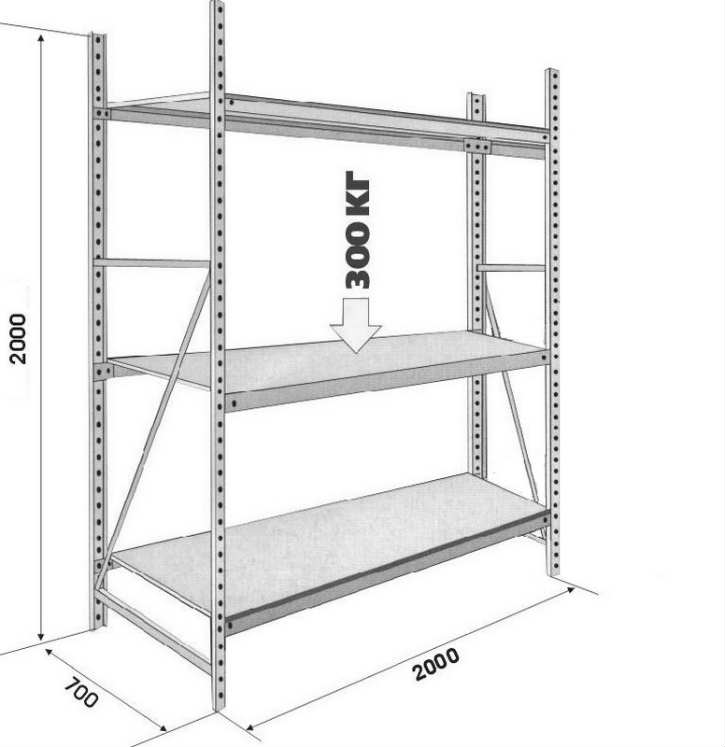
One of the features of the manufacture of any rack is the variety of design options. Its scheme is drawn up individually, depending on the specifics of use and the availability of free space. That is, there can be no specific instructions on sizes in principle. Designing and then installing the rack with his own hands, the master himself determines all its linear parameters, shape, configuration, in accordance with the dimensions of the room and location.
It should be noted that "metal" should not be taken literally. As a rule, in order to reduce the weight of the structure, simplify the assembly process and the cost of its manufacture, only a frame is made of "iron", and it is desirable to choose wood or plastics for shelves. It is not advisable to use metal for them, since you will have to work with rather thick sheets (to avoid deflection), or weld stiffeners (from a bar or corner) under each bottom. And this is additional complexity in assembly and costs in time and finances.
When drawing up a drawing, you need to focus on the specifics of using the rack. That is, what it is intended to store. The width of its shelves primarily depends on this. As a rule, metal structures are erected to install cans of conservation on them (if it is a cellar), storage of consumables, tools and spare parts (garage option). The manufacturing instructions for this item are simple - so that everything fits tightly and rationally enough, while not significantly reducing the usable area of \u200b\u200bthe room, shelves 35 - 40 cm wide are enough.
It is advisable to make them different. For example, a couple of tiers are wider, and the rest are somewhat narrower. On a rack made according to such a drawing, it will be possible to compactly fit everything - overall and heavy parts below, and tools, consumables, containers with lubricants, paints, and the like - above.
How to determine the length of the shelves?
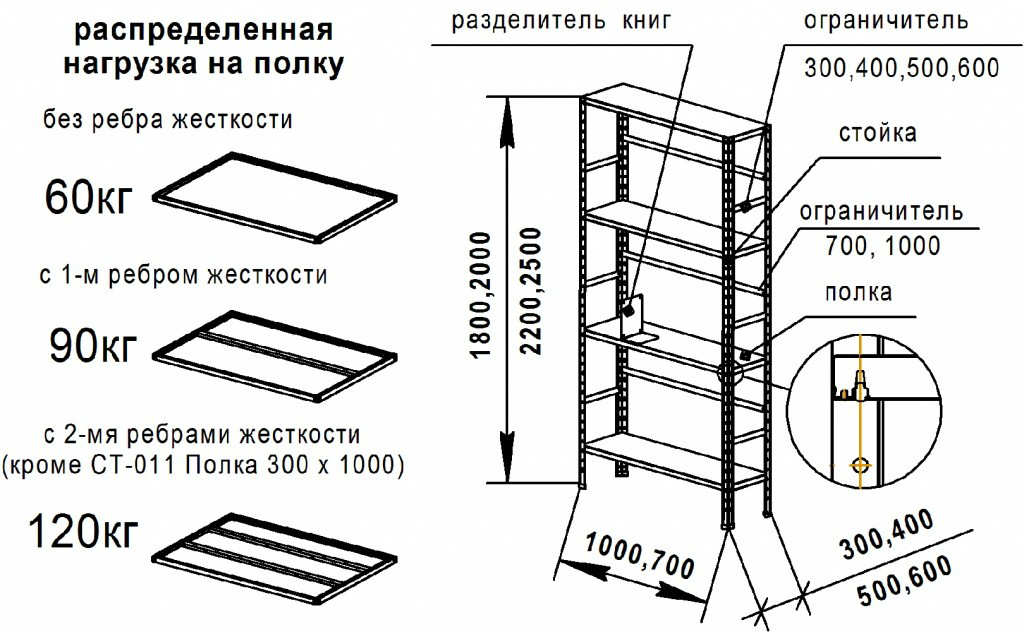
More than a meter, if it is supposed to store heavy objects, they should not be done. Deflection cannot be avoided, so you will have to use a clearance corner to assemble the frame. And it costs more, and it is much more difficult to work with it. Plus - the rack will turn out to be quite massive.
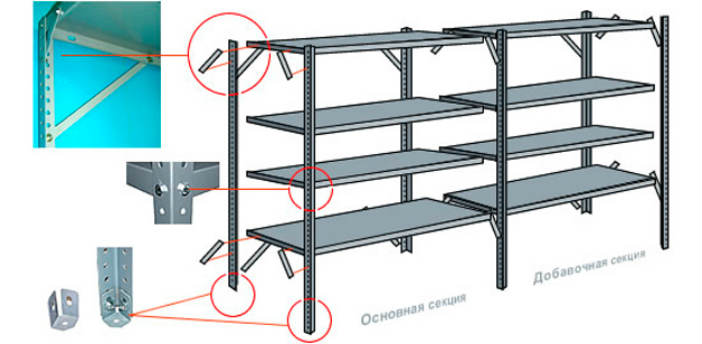
How to fasten structural elements? There are few options - welding or bolted connections. What's better?
 Welded construction - monolith. Therefore, changing the original project simply will not work. One of the ways to transform the interior is to change the places of installation of furniture. A rack mounted using a welding machine is unlikely to be moved to the other end of the room and positioned so that it fits organically into the overall environment. And even more so to transfer to another, given the height of the doorways. Such designs are better suited for various utility rooms (outbuildings), but not for living quarters.
But the rack on the bolts for them - just right. It is easy to dismantle, if necessary, change the circuit and reassemble. The only difficulty is that you have to deal with numerous connections. Therefore, it will take more time to manufacture such a rack.
Fixing the rack to the wall. The instruction is short. If the base is made of reinforced concrete, then the recommended length of fasteners is at least 7 cm. For brick or wooden walls, 4.5 is enough.
Shelf base. It all depends on what floor it will be installed on. For greater stability, if the design is overall, it is advisable to provide for a “sled” from a large corner when drawing up a drawing. With a small frame size, it is enough to weld metal nickels onto the ends of the racks, additionally “fastening” them to the floor.
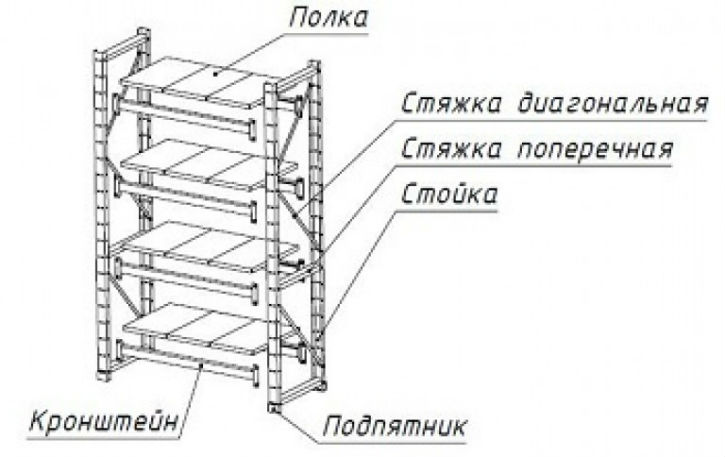
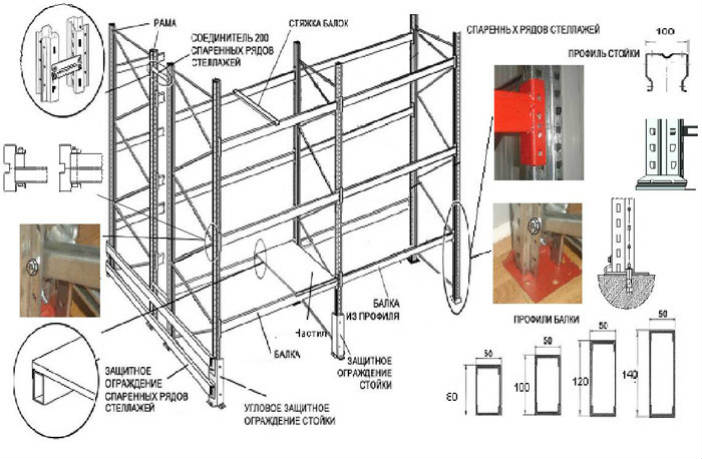
The first stage is the assembly of the frame. It is always attached to the wall and floor. If the height of the frame is adjacent to the ceiling, then it is desirable to fix it on the ceiling. The main attention at this stage should be given to the geometry of the rack. All its structural elements must be located either parallel or at right angles.
The second stage is the formation of boxes and the installation of shelves. Considering the conditions under which metal racks are mainly used, it is not worth using GKL sheets for the sidewalls and the back wall. Multilayer plywood, chipboard, OSV and similar products are suitable. For shelves, the board is optimal. Depending on length and load in the range of 10 - 15 mm. If you correctly draw up a drawing and determine the dimensions, then they will not have to be attached to a metal frame. They fit into the nests formed by the corners.
The third stage is the processing of the rack. Moisture-repellent paint should be used for metal parts. Wood elements are impregnated with antiseptics and varnished (if the rack is for living quarters) or painted. As an option for additional design - the use of edges, decorating with thick paper or plastic.


