Installing a new chandelier in a room is a milestone. Before you hang the chandelier on the ceiling in the apartment, it must be properly assembled. Fortunately, the construction of most chandeliers is not so complicated, so let's move on to the next part of the preparatory work.
Let's start with the most elementary. To get started, answer the questions:
If there are only 2 wires, then forget about the possibility of turning on different parts of the chandelier with a two-gang switch. Without installing a third wire, nothing will work. This means that all the wires in the chandelier are assembled into bundles of a certain color. If 3 wires are connected to the lamp, and you need the light to turn on not at the same time, then in the chandelier, the wires going to the thread of the cartridge and the ground wire are collected in one bundle, while the others are divided into 2 groups, and are also twisted into bundles.
Bad contact will not only lead to heating of the wire, but can also cause premature failure of the housekeeper.
To work, you need a simple tool:
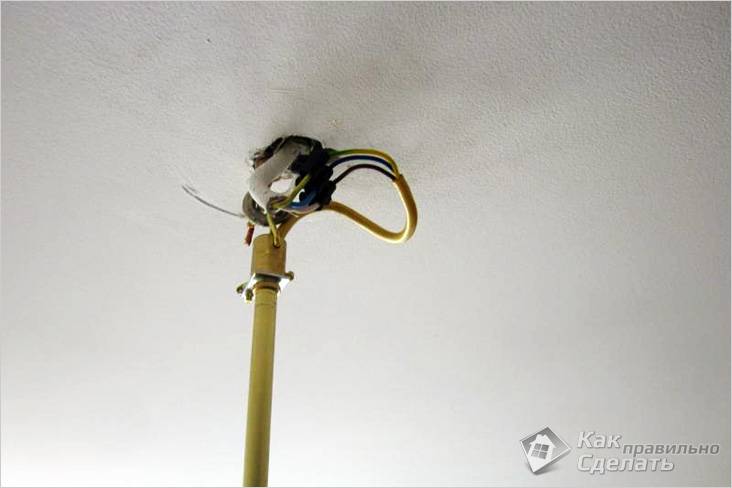
The need for a key arises when assembling a chandelier. An indicator screwdriver is required to determine the location of the wire connection. Take it in your hands, and at the moment when you touch the tip of the screwdriver, and its upper part, it should light up - this means that the device is working. Now, holding the top edge of the screwdriver, touch the thread (or side contact) in the chuck with the tip. With your free hand, touch the wires coming out of this cartridge. When you touch one of them, the indicator should light up. Wires of the same color will be "ground".
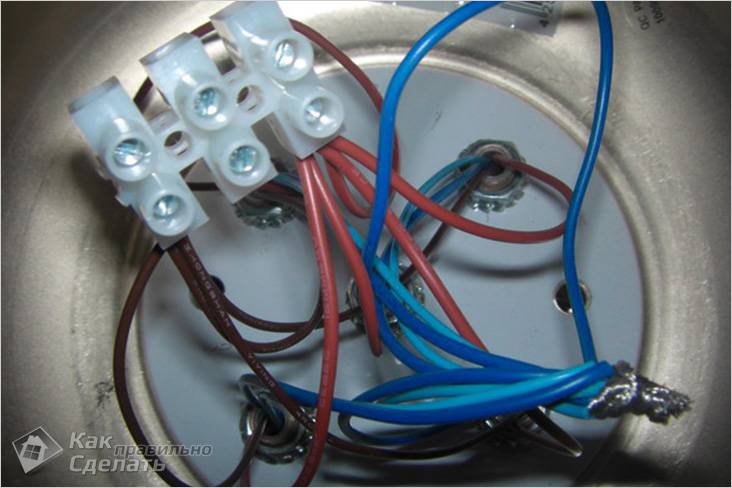
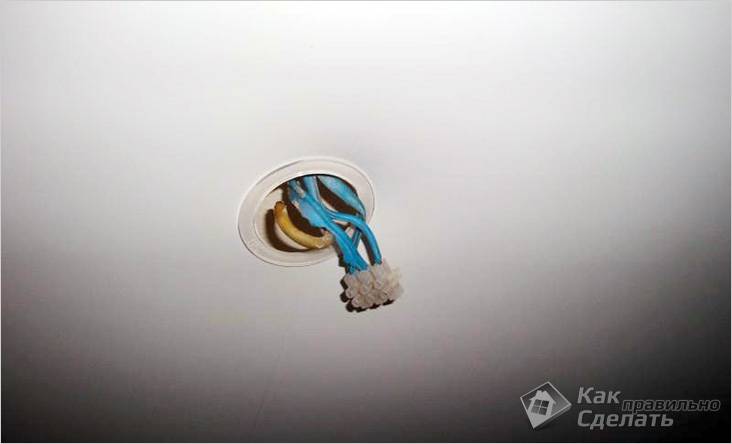
Insert the separated bundles of wires into the terminal block of your choice, and fasten it securely.
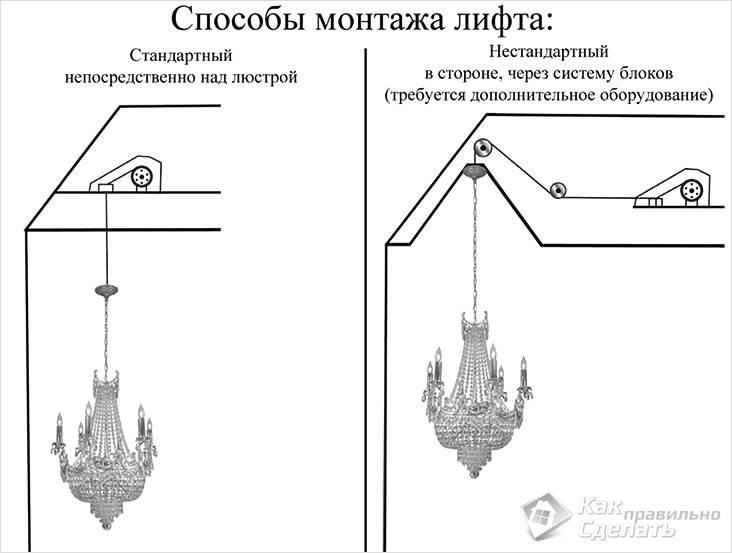
Let's look at two main methods.
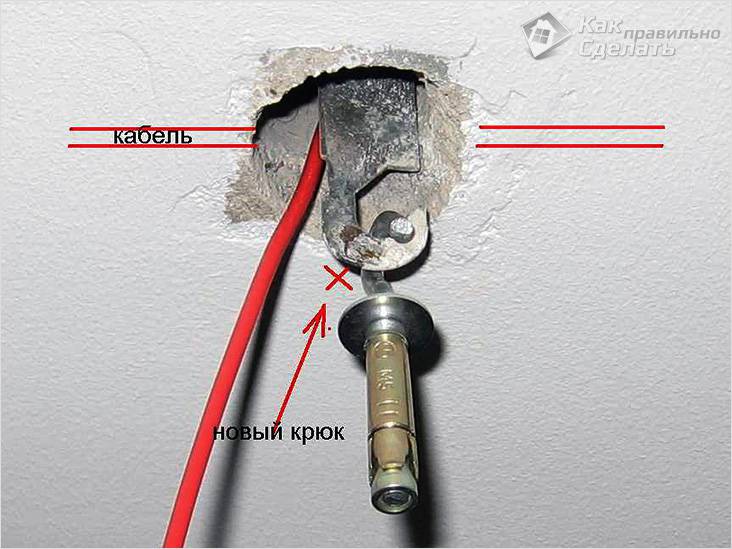
This used to be the most common method, but is now a thing of the past. Nevertheless, there are still many options for chandeliers with just such a mount.
Some craftsmen solved this problem in their own way - they replaced the plastic hook with a homemade one made from a welding electrode.
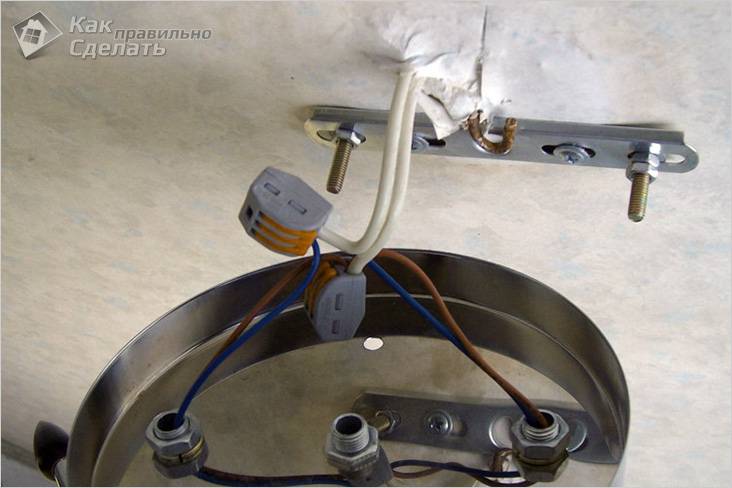
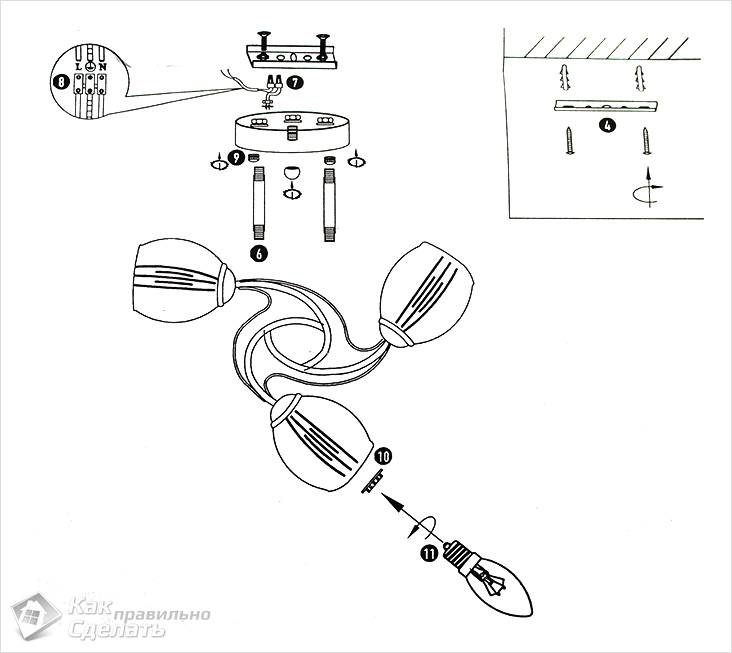
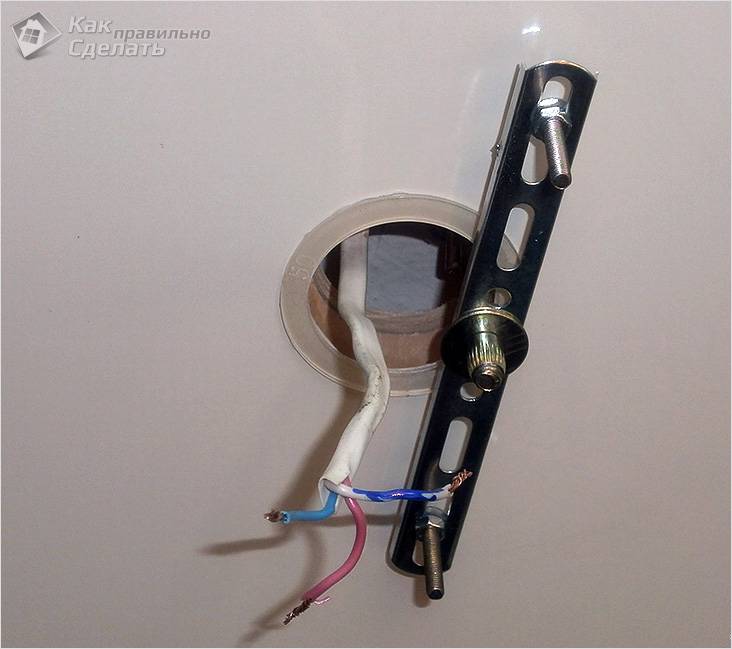
Included with the chandelier is a special mounting plate, which must be properly prepared before installing it on the ceiling. Fasten the screws on it with nuts so that their caps are in the inside of the bar, just do not clamp them. Insert the plank from the inside of the bowl into the chandelier as it will be installed later, tightening the decorative nuts until it stops - the bar should be flush with the edges of the chandelier bowl, or slightly below it.
After checking, securely tighten the screws in the bar so that they do not turn, otherwise removing the chandelier can be a big problem. Attach the plank to the ceiling where it will be installed and mark the ceiling through the holes. With the plank aside, drill through the concrete base of the ceiling and insert the dowels. After that, a plank is attached to the ceiling, and the chandelier itself is attached to it. If the base of the ceiling is wooden, then the plank is attached to it with wood screws.
![]()
When the switch contacts are open, there should be no voltage on the wires.
This means that when you touch the wires with an indicator screwdriver, it should not glow. In this case, a screwdriver that works without batteries will give a more accurate result. After turning on the power, the indicator should show the presence of voltage on two wires. The remaining one is the "earth", which must be connected to the common beam of the chandelier. If this is not the case in your case, then this means that the switch does not turn off the phase, but the ground. If you have incandescent lamps or LED lamps connected, then you can leave it that way, such a connection is not suitable for housekeepers, as they can blink (this was written above).
In no case do not install housekeepers if the chandelier is connected through a dimmer!

Often people try to increase the brightness of the glow by replacing regular lamps with more powerful ones, as a result of which the chandelier ceases to function.
To prevent the transformer from failing, keep an eye on the total consumption of the lamps - it must be lower than the output power of this device.
If your chandelier is with halogen bulbs, then most often they are powered by 12 V. In this case, the power is connected through a step-down transformer, on which the voltage at the outputs is always written. Where the voltage is 220V - we connect to the network, and the contacts with the designation 12V - to the light bulbs.
When connected directly, the bulbs must be rated 220V. Otherwise, halogen lamps designed to work through a transformer will explode, and glass fragments will scatter throughout the room.
All wires must be carefully insulated.
In order to fix the mounting strip to the concrete ceiling, you need to attach it to the intended mounting location, and make marks on the ceiling where the holes will be drilled. If the ceiling is made of hollow slabs, then you need to check the thickness of the concrete in the place where the hole will be drilled, as it may happen that the dowel will have nothing to hold on to. You may have to step aside, or position the bar differently. In the event that nothing can be changed, then you can use anchors, or, lead a wooden lath into the cavity of the plate, and screw the bar to it with screws. To do this job you will need:
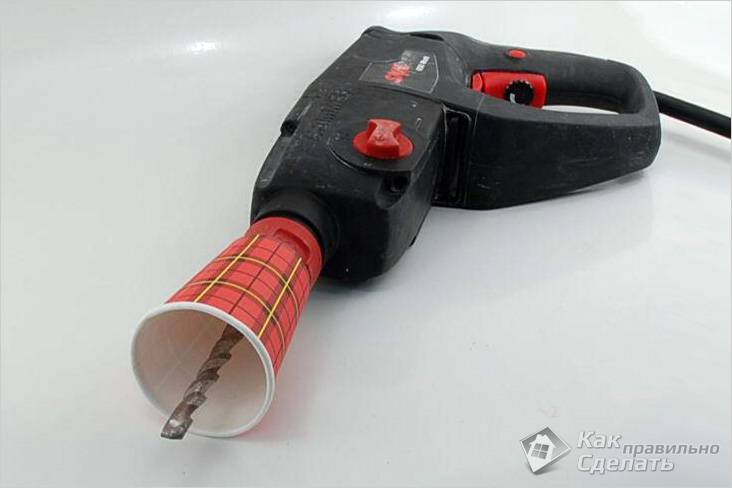
Before you start drilling, make sure that dust and sand do not get into the drill chuck. For this purpose, you can pull a disposable cup on the drill, or half a rubber ball, and then drill.
Depending on the mounting method you choose, secure the bar securely, but don't overdo it, as it can bend if you press too hard.
What difficulties can arise when installing a chandelier on a plasterboard ceiling? The fact is that both the appearance of the plasterboard ceiling and the mechanical strength of the installed structures are important.
It is necessary to decide in advance on the choice of a chandelier, and determine how it will be fixed. Consider the main recommendations:
During operation, it is important to observe safety precautions - ensure safe movement under the ceiling and de-energize the electrical system.
If it is impossible to de-energize the room, then you need to work in rubber gloves of an electrician and use a good tool (nippers and pliers must be with intact handles).
Drywall has strong mechanical properties, and for this reason the installation is carried out directly to the material itself. But this method has limitations.
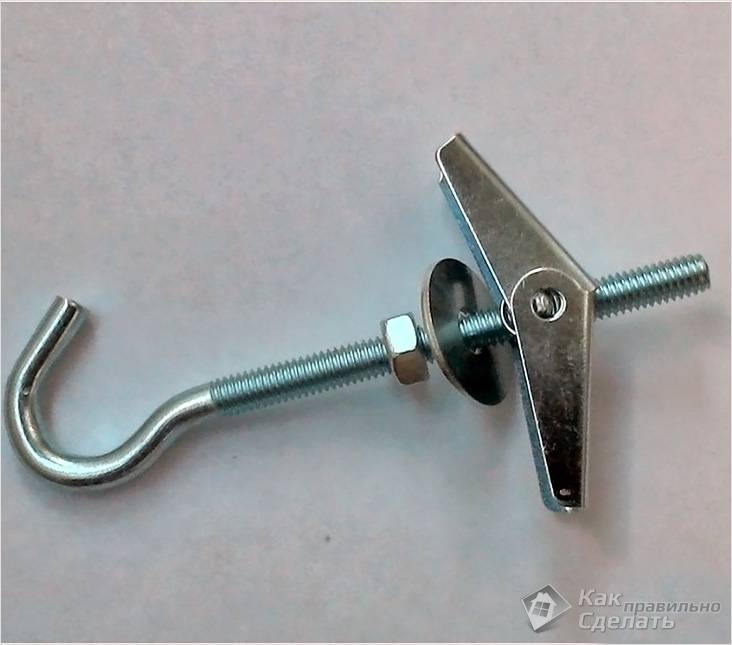
First, consider the option of mounting a hanging chandelier. First of all, you need to drill a hole in drywall (under the selected fasteners) and insert a spring dowel or butterfly - in this place the chandelier will be suspended from the ceiling.
The spring dowel must be tightened with a nut, and the butterfly must be tightened with a self-tapping screw (there should be a click). The dowel and butterfly must be equipped with a hairpin or hook. After that, you can hang the chandelier on the hook and connect the wiring.
Holes are made at the marked points, as in the case of a hanging chandelier, but there was a hook, and here we will use butterfly dowels, to which a bar will be attached with screws. Now the most interesting thing - holding the chandelier under the ceiling, you need to connect the wiring, and only after that it will be possible to fix the chandelier.
It is extremely inconvenient to do this work alone, so you need someone who will hold the chandelier until you finish the wiring work. If there is nowhere to wait for help, then make a small hook and hang the chandelier on it for a while so as not to scratch it.
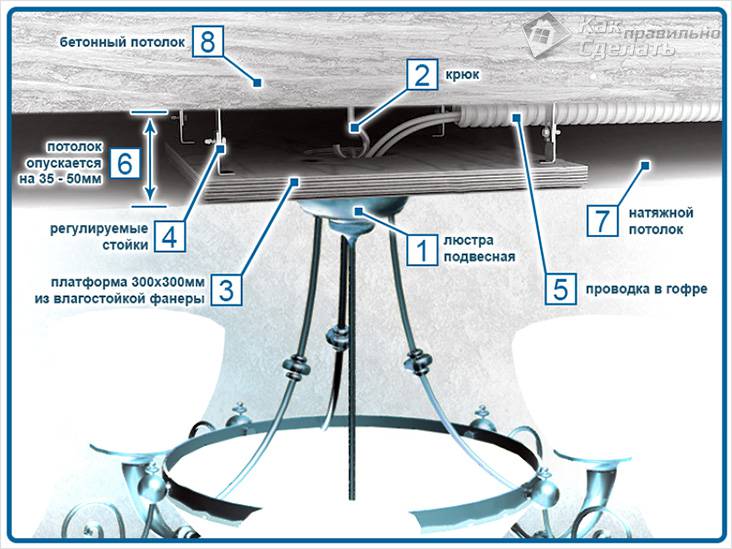
When installing a stretch ceiling, you should take care in advance which chandelier or lamp will be on the ceiling, and which mount for the lighting fixture should be used. This is important to take into account, because the stretched material is not the basis for fastening, and if the integrity of the film is violated, the canvas will simply break.

It is important to pay attention to the choice of a chandelier so that it does not spoil the expensive ceiling covering. In this case, you need to consider which lamps will be used. For example, it is better to purchase a chandelier with energy-saving lamps, since they heat up less during operation. If halogen or incandescent lamps are used, then they should be hidden in the ceiling and not directed at the ceiling, but to the side.
If you purchased a chandelier with cartridges for conventional incandescent lamps, then it is better to screw in housekeepers or LED bulbs instead. It is important to know that if the chandeliers are overhead with a thin metal base, then adjoining the stretch ceiling in a heated state from incandescent lamps can lead to its deformation.
You also need to make sure that the base of the lighting fixture, which covers the fastener, does not have sharp edges and will not tear the film.

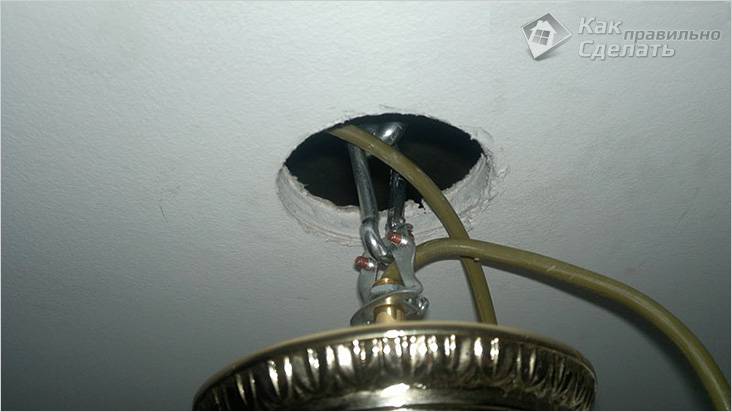
The most common and reliable mounting method is hook-and-loop fastening. But this method is only suitable for hanging chandeliers.
You need to know how far the stretch ceiling will be from the main ceiling, and also bring the ends of the electrical wire to the installation site.
After the fabric of the stretch ceiling is stretched, where the hook is located, you need to glue a thermal ring, inside which a hole is cut out for the output of wires, and then the chandelier is fastened. This happens in this way: the chandelier must be hung on a hook, the wires connected, and the attachment point covered with a cap of the lighting fixture.
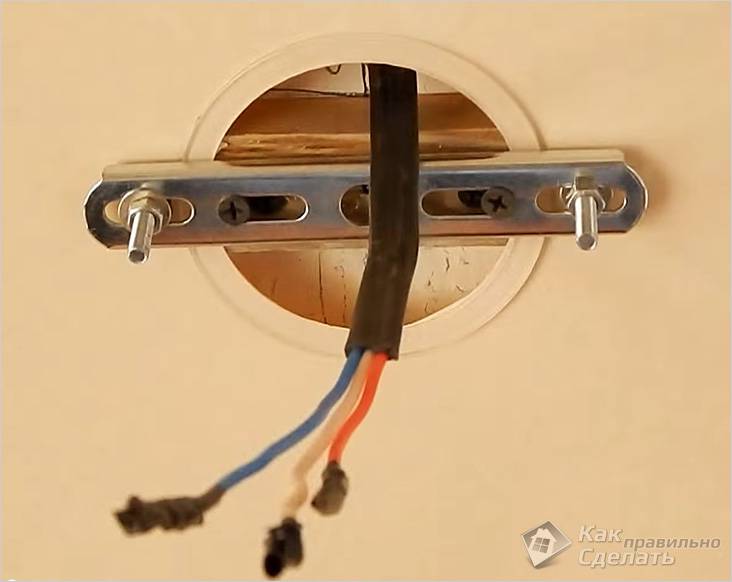
The chandelier can be mounted on a bar or mounting plate.
The kit of most lighting fixtures includes special fasteners - a metal profile with screws (mounting plate, which was mentioned earlier). It is attached to the main ceiling, and the chandelier is fixed on top of the stretch ceiling with screws using decorative nuts.
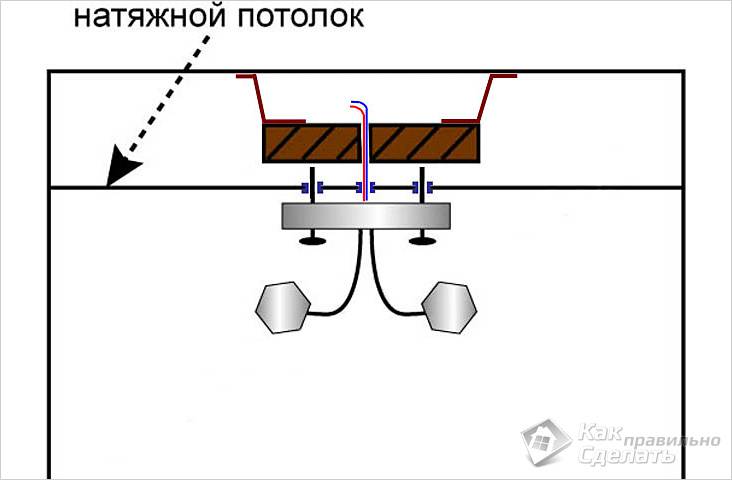
Another fastening of the chandelier to the stretch ceiling involves the installation of a wooden bar to the main ceiling, the length of which should not reach the stretch ceiling by almost 1–2 cm. Otherwise, the bar will protrude and may eventually tear the stretch ceiling film. Next, the bar should be attached to the ceiling using self-tapping screws with dowels. And when using a wooden block, it is also necessary to make a hole, reinforcing it with a thermal ring.
The mounting plate is attached to the bar without going beyond the hole. Then the base of the lighting device is attached to the plate. Further, the holes of the base must be connected with studs (or screws) and screwed with nuts.
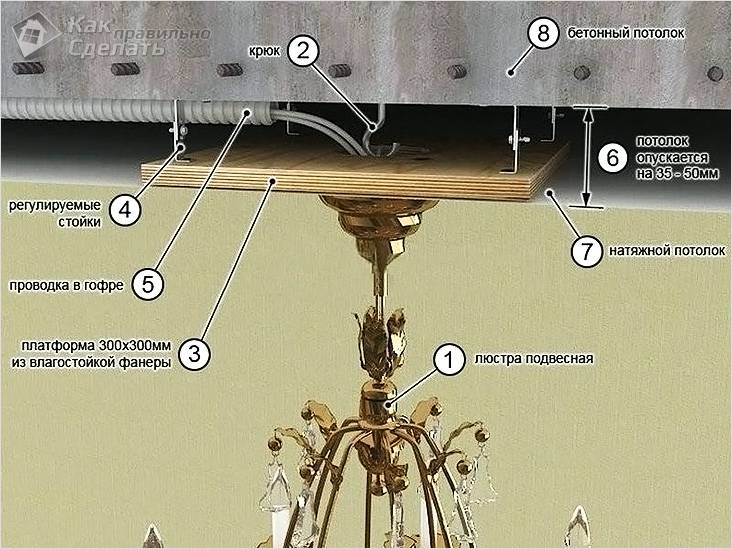
In some cases, instead of a wooden block, thick moisture-resistant plywood with attached metal legs is used as a base.
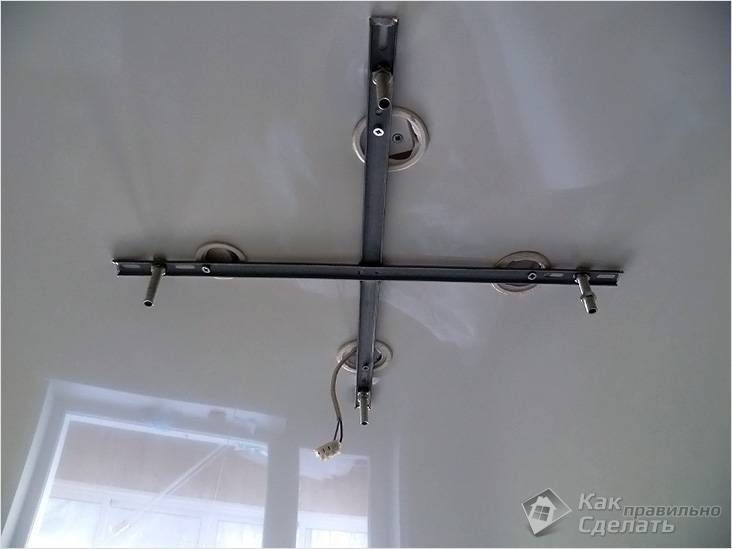
This type of fastening is intended mainly for heavy chandeliers with a wide base. Due to the fact that the mounting holes are far from each other, it will not be possible to fix the chandelier within the hole. To do this, a wooden block in the size of the cross is again attached to the main ceiling as a base. It is necessary to carefully cut out five holes in the stretch ceiling canvas and reinforce them with thermal rings: one large hole to bring out the electrical wires and connect the power, and the other four are smaller. Instead of thermal rings of small diameter, where self-tapping screws are screwed in, you can use pieces of plastic that are glued to a stretch ceiling. This procedure must be done, otherwise the film will tear where the hole is made.
When the wires are connected, you can hang the chandelier on the crosspiece and fix it with nuts.